Chapter 3: Installing ArgoCD
Like many GitOps solutions, Argo CD serves various users with distinct business goals. Because requirements vary so widely, the platform offers several installation configurations. Choosing the right one depends on five key factors:
- User Base: Who are the primary users and consumers?
- Management Scope: What specific infrastructure or applications will Argo CD oversee?
- Availability: Is high availability (HA) a critical requirement for your operations?
- Security: What are the mandatory security and compliance standards?
- Automation: What are your specific needs for bootstrapping and automated workflows?
ArgoCD offers two main installation types depending on your use case:

Core Installation
This is a minimal, lightweight installation intended for users who only need the core GitOps sync functionality without the full ArgoCD UI or API server.
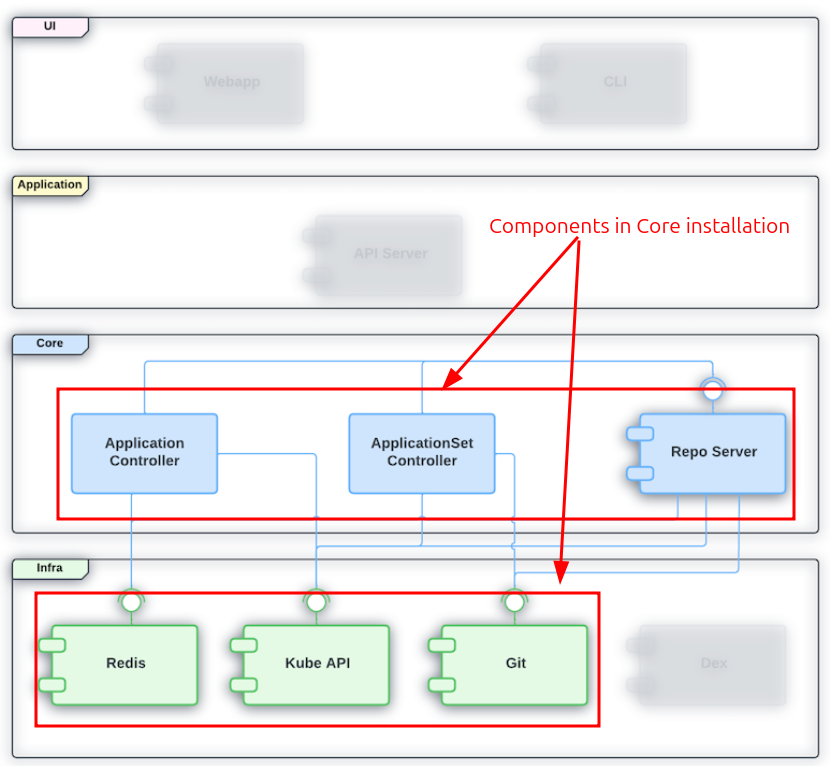 Image source: Official ArgoCD Docs Website
Key characteristics:
- Installs only the essential components: the application controller, repo server, and ApplicationSet controller
- No API server, no UI, no Dex (authentication server), a minimal version of Redis
- Intended for cluster admins managing their own cluster, not for multi-tenant or team-shared setups
- Interaction happens via the
argocdCLI (usingargocd admincommands) orkubectldirectly — not through the web UI - Lower resource footprint, simpler attack surface
Best for: Single-tenant, admin-only usage where you want ArgoCD purely as a sync engine with no web interface.
Default (Full) Installation
This is the standard, full-featured installation most teams use. It includes everything needed to operate ArgoCD as a shared platform.
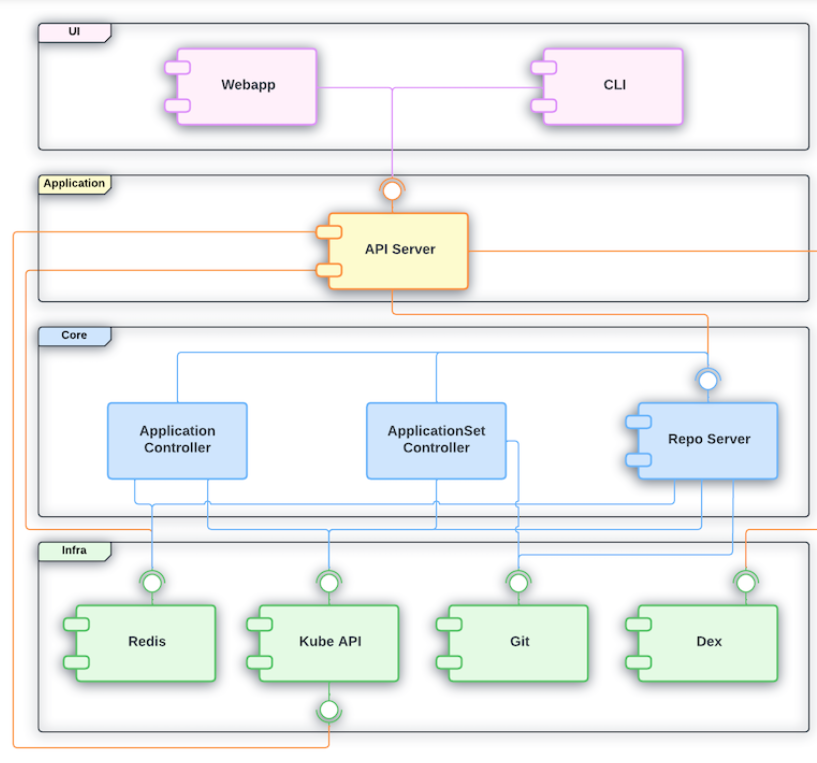 Image source: Official ArgoCD Docs Website
Key characteristics:
- Installs all components: API server, UI, repo server, application controller, ApplicationSet controller, Dex (SSO), Redis (for caching)
- Exposes the web dashboard and the full REST/gRPC API
- Supports multi-tenancy — multiple teams or users can log in, manage projects, and interact with their own apps
- Supports SSO via Dex (integration with GitHub, LDAP, OIDC providers, etc.)
- Higher resource usage, but far richer feature set
Best for: Teams and organizations that want a shared GitOps platform with a UI, RBAC, SSO, and API access.
Use Core if you want a lean sync engine you manage via CLI, and Default if you want the full ArgoCD experience with a UI and team collaboration features.
ArgoCD Operating Modes
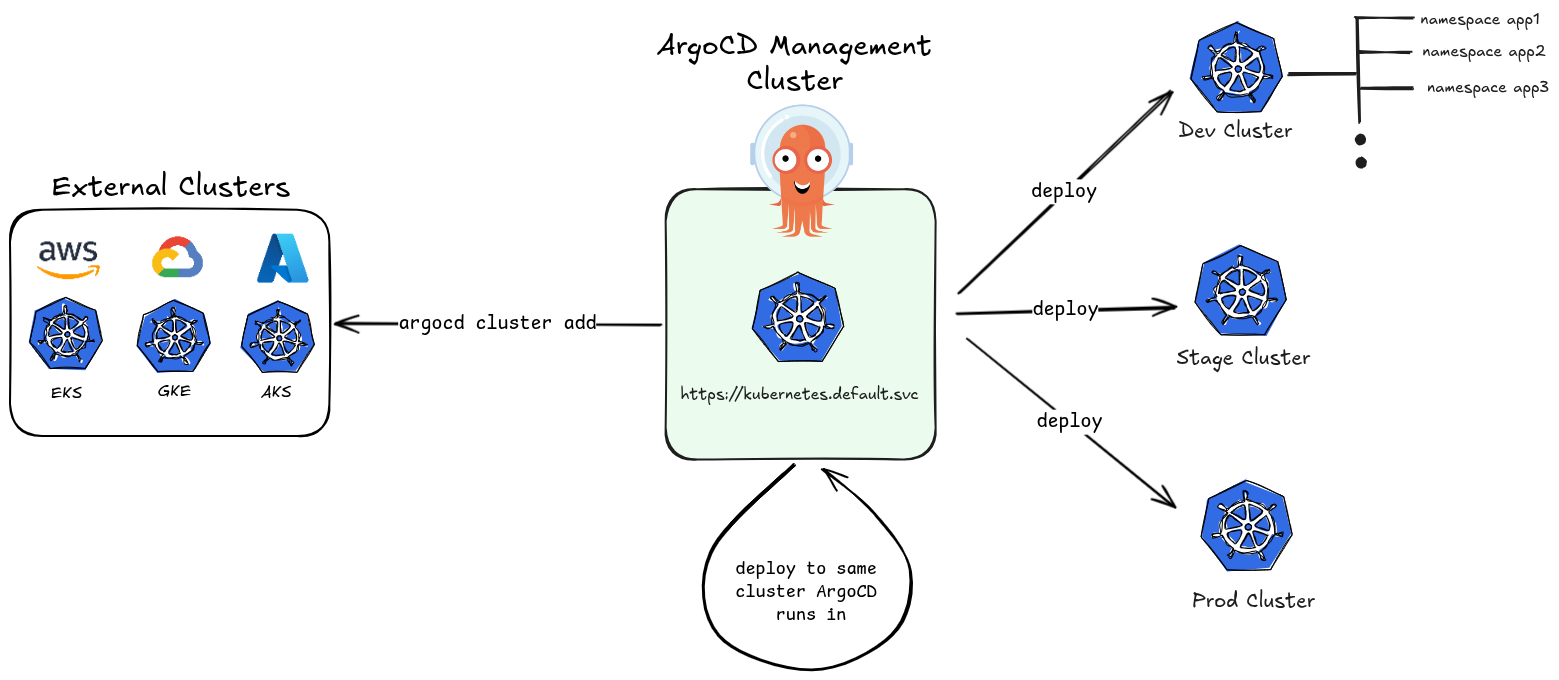
Cluster-Scoped Mode (Internal & External Clusters)
This is the default operating mode when ArgoCD is installed with cluster-wide permissions.
Internal Cluster:
ArgoCD can deploy to the same cluster it runs in. This cluster is registered automatically and is referred to as https://kubernetes.default.svc — the in-cluster API server address. No extra registration is needed; it’s available out of the box.
External Clusters:
ArgoCD can also manage remote Kubernetes clusters outside of where it’s installed. These are registered explicitly using:
argocd cluster add <context-name>
This creates a ServiceAccount with the necessary permissions in the target cluster and stores the credentials as a Secret in ArgoCD’s namespace.
Key characteristics:
- ArgoCD has cluster-admin level permissions (via
ClusterRole) - It can manage resources across all namespaces of any registered cluster
- One ArgoCD instance can act as a central control plane managing dozens of clusters
- Suitable for platform/ops teams managing infrastructure at scale
Namespaced Mode
This is a restricted operating mode where ArgoCD’s permissions are limited to a specific namespace rather than the entire cluster.
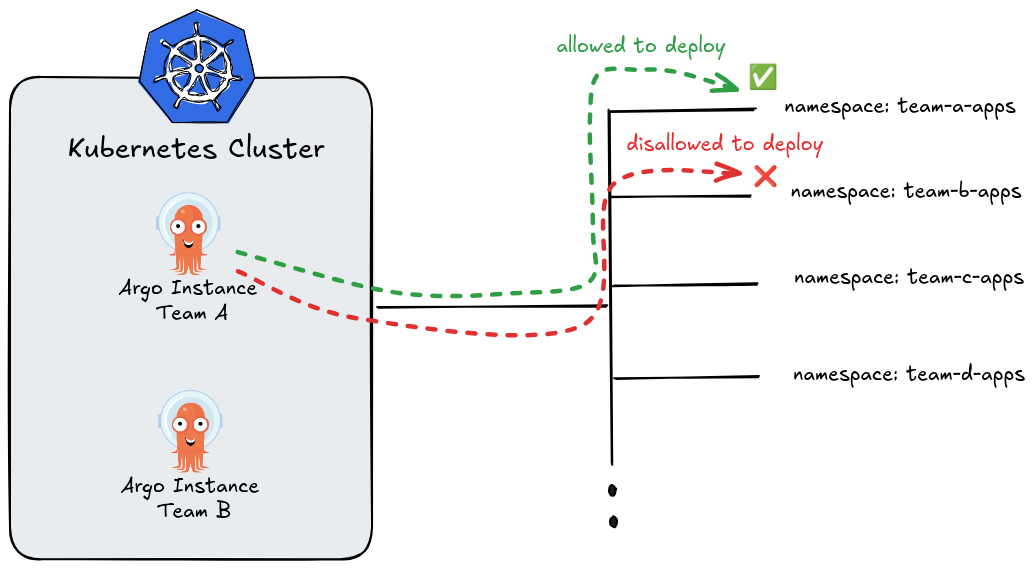
Key characteristics:
- ArgoCD only gets
Role(notClusterRole) — scoped to one namespace - It can only manage resources within its own namespace
- Multiple ArgoCD instances can run side by side in the same cluster, each in its own namespace, without interfering with each other
- Each team or tenant can have their own isolated ArgoCD instance
- Cannot register or manage external clusters (no cluster-level secret access)
Installed using:
kubectl apply -n my-namespace -f https://raw.githubusercontent.com/argoproj/argo-cd/stable/manifests/namespace-install.yaml
For more information, see github.com/argoproj/argo-cd/tree/master/manifests
Quick Comparison
| Feature | Cluster-Scoped | Namespaced |
|---|---|---|
| Permission scope | Cluster-wide (ClusterRole) | Single namespace (Role) |
| Manages external clusters | ✅ | ❌ |
| Manages in-cluster | ✅ (all namespaces) | ✅ (own namespace only) |
| Multi-tenancy isolation | Limited | Strong |
| Multiple instances per cluster | Not typical | ✅ Common pattern |
| Best for | Central platform teams | Per-team isolated deployments |
Use Cluster-Scoped mode when you need a centralized ArgoCD managing many clusters, and Namespaced mode when you want strong isolation between teams sharing a single cluster.
Creating Kubernetes Cluster
💡 PRACTICE
To access code files go to Chapter 2
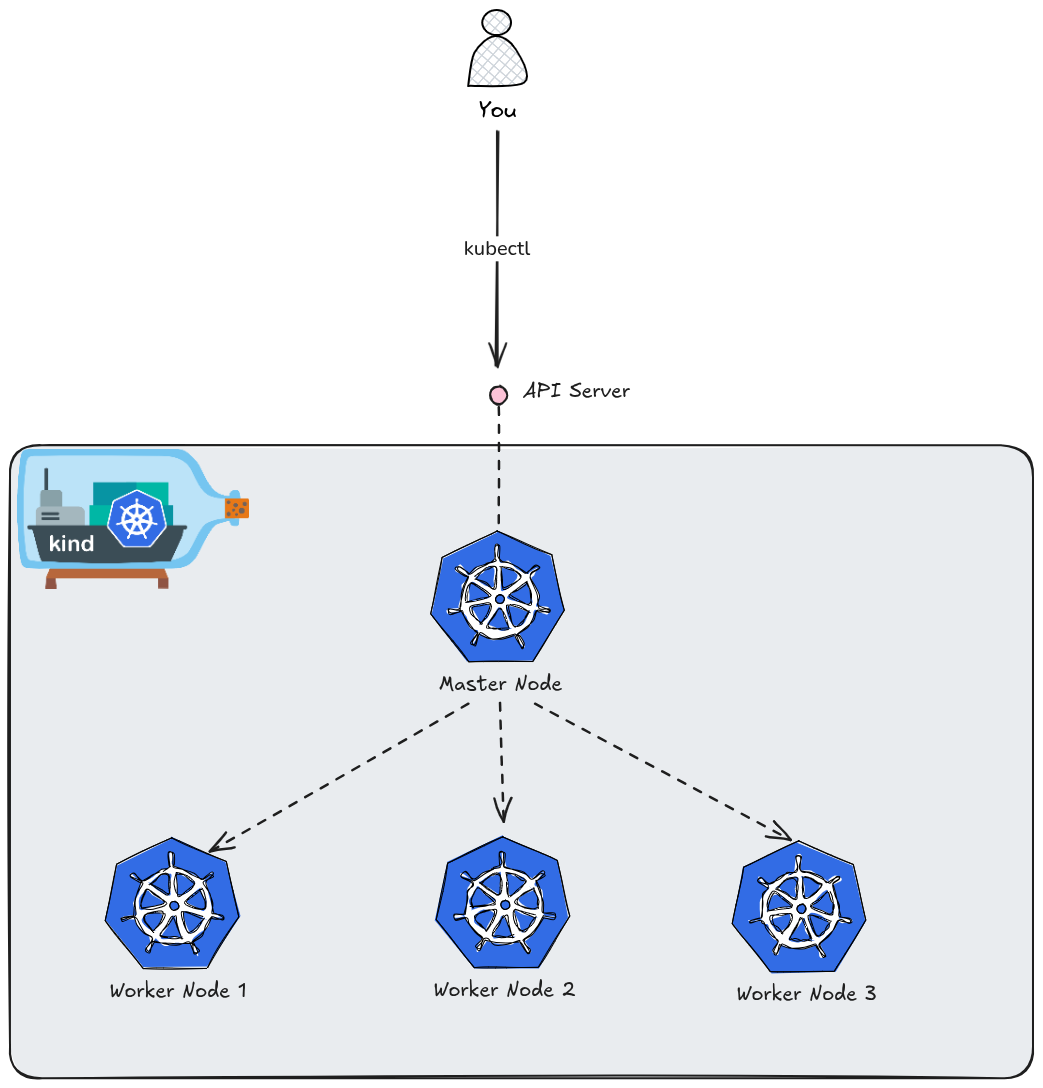
For our examples we will use kind tool to create Kubernetes cluster.
To create a specific multi-node configuration in Kind, you need to move beyond simple CLI flags and use a YAML configuration file.
By default, Kind creates a single-node cluster. For our setup we will use your 1 Control Plane (Master) and 3 Worker nodes:
Create the kind Configuration File
Create a file named kind-config.yaml. This file defines the topology of your cluster.
kind: Cluster
apiVersion: kind.x-k8s.io/v1alpha4
nodes:
  # The one master node (control-plane)
  - role: control-plane
  # The three worker nodes
  - role: worker
  - role: worker
  - role: worker
Create the Named Cluster
Run the following command to spin up the cluster. The --name flag allows you to give it a custom identifier (e.g., my-custom-cluster), and the --config flag points to the YAML file you just created.
kind create cluster --name my-custom-cluster --config kind-config.yaml
Verify the Nodes
Once the process finishes, verify that all four nodes (1 control-plane + 3 workers) are up and running:
kubectl get nodes
Expected Output:
NAME                                STATUS   ROLES           AGE   VERSION
my-custom-cluster-control-plane     Ready    control-plane   1m    v1.35.0
my-custom-cluster-worker            Ready    <none>          1m    v1.35.0
my-custom-cluster-worker2           Ready    <none>          1m    v1.35.0
my-custom-cluster-worker3           Ready    <none>          1m    v1.35.0
Tips for Multi-Node Kind Clusters
- Resource Usage: Remember that each “node” is actually a Docker container. Running four nodes will consume significantly more RAM and CPU than a single-node setup. Ensure your Docker Desktop or Docker Engine has at least 8GB of RAM allocated.
- Context Switching: If you have multiple Kind clusters, you can switch between them using:
kubectl config use-context kind-my-custom-cluster - Deleting the Cluster: When you’re done, clean up everything with:
kind delete cluster --name my-custom-cluster
Installing ArgoCD via Helm
To install Argo CD via Helm, you will use the official community-maintained repository. Helm is the preferred method for many because it makes managing updates and customizing configurations (like cluster-scoped vs. namespace-scoped) much easier than raw manifests.
Add the Argo Helm Repository
First, add the repository to your local Helm client and update it to ensure you have the latest chart versions.
helm repo add argo https://argoproj.github.io/argo-helm
helm repo update
Configure for Cluster-Scoped Mode (Default)
By default, the Argo CD Helm chart installs in cluster-scoped mode. This means the Argo CD controller has a ClusterRole and can manage resources across the entire cluster.
If you want to verify or customize settings, you can create a values.yaml file, but for a standard installation, the default values are sufficient.
Install the Chart
Create the namespace and install the chart. We will name the release argocd.
# Create the namespace
kubectl create namespace argocd

# Install the chart
helm install argocd argo/argo-cd --namespace argocd
You should see output similar to this:
NAME: argocd
LAST DEPLOYED: Thu May 14 21:03:57 2026
NAMESPACE: argocd
STATUS: deployed
REVISION: 1
TEST SUITE: None
NOTES:
In order to access the server UI you have the following options:

1. kubectl port-forward service/argocd-server -n argocd 8080:443

    and then open the browser on http://localhost:8080 and accept the certificate

2. enable ingress in the values file `server.ingress.enabled` and either
      - Add the annotation for ssl passthrough: https://argo-cd.readthedocs.io/en/stable/operator-manual/ingress/#option-1-ssl-passthrough
      - Set the `configs.params."server.insecure"` in the values file and terminate SSL at your ingress: https://argo-cd.readthedocs.io/en/stable/operator-manual/ingress/#option-2-multiple-ingress-objects-and-hosts


After reaching the UI the first time you can login with username: admin and the random password generated during the installation. You can find the password by running:

kubectl -n argocd get secret argocd-initial-admin-secret -o jsonpath="{.data.password}" | base64 -d

(You should delete the initial secret afterwards as suggested by the Getting Started Guide: https://argo-cd.readthedocs.io/en/stable/getting_started/#4-login-using-the-cli)
As output suggests don’t forget to delete the initial secret afterwards. For more information, see Getting Started Guide.
With kubectl get po -n argocd you can verify that all ArgoCD components are running as pods in argocd namespace:
NAME                                                READY   STATUS    RESTARTS   AGE
argocd-application-controller-0                     1/1     Running   0          20m
argocd-applicationset-controller-8466bbdf48-gx7sw   1/1     Running   0          20m
argocd-dex-server-5b97f65bfd-rsrkw                  1/1     Running   0          20m
argocd-notifications-controller-68767c8f58-shngh    1/1     Running   0          20m
argocd-redis-75fb94c8-44xg8                         1/1     Running   0          20m
argocd-repo-server-6c684bd96b-vwfl2                 1/1     Running   0          20m
argocd-server-599cd4fb9c-tpnrd                      1/1     Running   0          20m
As you can see all ArgoCD internal components for a full installation type are running in pods.
When you install Argo CD in this mode, the Helm chart sets up several components that interact to sync your Git repository to your Kubernetes cluster.
Common Helm Customizations
If you want to modify the installation during the helm install command, you can use the --set flag. Here are a few common examples:
- To enable the Ingress (if you have an ingress controller):
--set server.ingress.enabled=true
or enable ingress in the values file server.ingress.enabled and either:
- Add the annotation for ssl passthrough: https://argo-cd.readthedocs.io/en/stable/operator-manual/ingress/#option-1-ssl-passthrough
- Set the
configs.params."server.insecure"in the values file and terminate SSL at your ingress: https://argo-cd.readthedocs.io/en/stable/operator-manual/ingress/#option-2-multiple-ingress-objects-and-hosts
- To change the service type to LoadBalancer:
--set server.service.type=LoadBalancer
- To disable the initial admin password secret (not recommended for production):
--set configs.secret.createSecret=false
Using Custom Helm Values File
To see the available configuration options for the Argo CD Helm chart, you have two primary methods.
Method 1: The Helm CLI
You can extract the default values.yaml directly from the repository you added earlier without downloading the whole chart package.
helm show values argo/argo-cd > argocd-values.yaml
This command takes the default values, redirects them into a file named argocd-values.yaml, and saves it in your current directory.
Method 2: GitHub
If you prefer a searchable web interface with syntax highlighting, you can view the values.yaml file directly in the official argo-helm repository:
What to Look For in the File
The values.yaml for Argo CD is quite large (often over 2,000 lines) because it is highly configurable. Here are the key sections you might want to inspect:
global:Settings that apply to all components, like image registry mirrors or global labels.server:Configuration for the UI and API, including ingress, service type, and RBAC.controller:Settings for the application-controller (the “brain” that syncs your apps).repoServer:Configuration for the component that handles Git cloning and manifest generation.configs:Where you define things likecm(ConfigMaps) for custom styles orparamsfor system-wide behavior.
How to Use the File
Once you’ve identified a setting you want to change (for example, enabling the ingress), you don’t need to keep the entire 2,000-line file. It is best practice to create a “thin” values file:
- Create a new custom file called e.g.
my-values.yaml. - Add only the specific keys you want to override:
server:
  service:
    type: LoadBalancer
- Apply it during your installation or upgrade:
helm upgrade --install argocd argo/argo-cd -n argocd -f my-values.yaml
Accessing the UI
Just like the manifest installation, you’ll need to retrieve the autogenerated password:
kubectl -n argocd get secret argocd-initial-admin-secret -o jsonpath="{.data.password}" | base64 -d; echo
Then, port-forward to access the dashboard:
kubectl port-forward service/argocd-server -n argocd 8080:443
Default username is admin.
⚠️ NOTE
For production environment use Ingress with custom domain for ArgoCD UI Dashboard.
For more information, see Ingress Configuration.
How to Upgrade
One of the biggest advantages of using Helm is the ease of upgrading to newer versions of Argo CD:
helm repo update
helm upgrade argocd argo/argo-cd --namespace argocd
Note: Since we are using a Kind cluster with multiple nodes, Argo CD will treat all those nodes as part of the “in-cluster” destination (https://kubernetes.default.svc), allowing to deploy applications to any of those worker nodes easily.
Provision ArgoCD UI Dasboard with Ingress
⚠️ IMPORTANT
Please be aware that for demo purposes and simplicity we are using Nginx Ingress Controller that was archived and deprecated by Kubernetes Community.For production use-cases consider using other Ingress Controllers or Gateway API.
If you already have a cluster running, you will need to recreate it. We must add extraPortMappings to pass traffic from your real machine into the Docker container running the control plane, and label it as ingress-ready.
Save this file as kind-ingress-config.yaml:
kind: Cluster
apiVersion: kind.x-k8s.io/v1alpha4
nodes:
  - role: control-plane
    kubeadmConfigPatches:
      - |
        kind: InitConfiguration
        nodeRegistration:
          kubeletExtraArgs:
            node-labels: "ingress-ready=true"
    extraPortMappings:
      - containerPort: 80
        hostPort: 80
        protocol: TCP
      - containerPort: 443
        hostPort: 443
        protocol: TCP
  # Adding worker nodes
  - role: worker
  - role: worker
  - role: worker
Spin up the cluster using this config:
kind create cluster --name argo-project --config kind-ingress-config.yaml
If you need to delete cluster:
kind delete cluster --name argo-project
Deploy the NGINX Ingress Controller
The standard NGINX Ingress manifest needs slight tweaks to run properly inside Kind (such as utilizing the host ports we just mapped and scheduling onto our labeled control-plane node).
The Kubernetes team maintains a dedicated manifest specifically for Kind. Run this command to deploy it:
kubectl apply -f https://raw.githubusercontent.com/kubernetes/ingress-nginx/main/deploy/static/provider/kind/deploy.yaml
⚠️ IMPORTANT
The latest nginx ingress controller kind manifest no longer enforces thenodeSelectorforingress-ready=true, so it is required explicitly patch Nginx Ingress deployment. However, old releases has that support as in here.Without that, the pod lands on a worker node which has no host port mappings, so port 80 never gets traffic
Patch the deployment to make Ingress controller pods run on the control-plane node:
kubectl patch deployment ingress-nginx-controller -n ingress-nginx --type=json \
  -p='[{"op":"add","path":"/spec/template/spec/nodeSelector","value":{"ingress-ready":"true"}}]'
Wait until ready:
kubectl wait --namespace ingress-nginx \
  --for=condition=ready pod \
  --selector=app.kubernetes.io/component=controller \
  --timeout=90s
You should see output similar to this:
pod/ingress-nginx-controller-56dc4b4c6-wmlm6 condition met
Testing With Local Domain
For local testing, you don’t need to buy a real domain name or modify your DNS records on the internet. Instead, you can use a local hosts file override.
This method tells your operating system that a specific domain name lives at 127.0.0.1 (localhost) instead of looking it up on the internet.
- Pick a fake domain name for testing, such as
argocd-dashboard.uiormy-app.test. - Open your machine’s hosts file:
- Linux / macOS:
sudo vim /etc/hosts
- Add the following line at the bottom of the file:
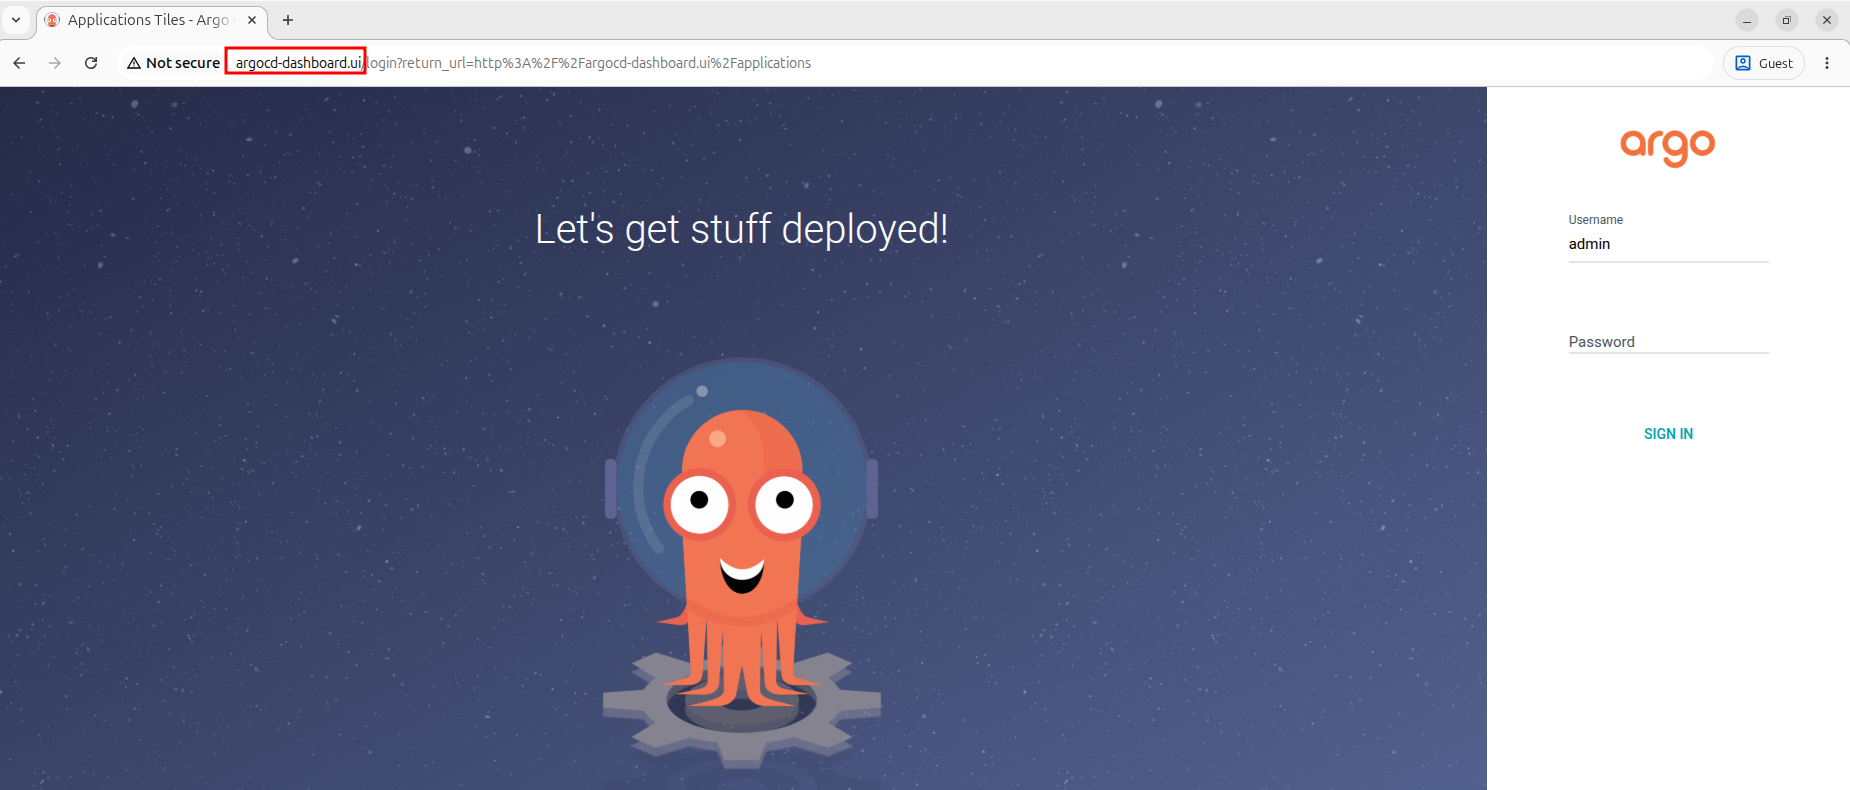
127.0.0.1 argocd-dashboard.ui
- Save and close the file.
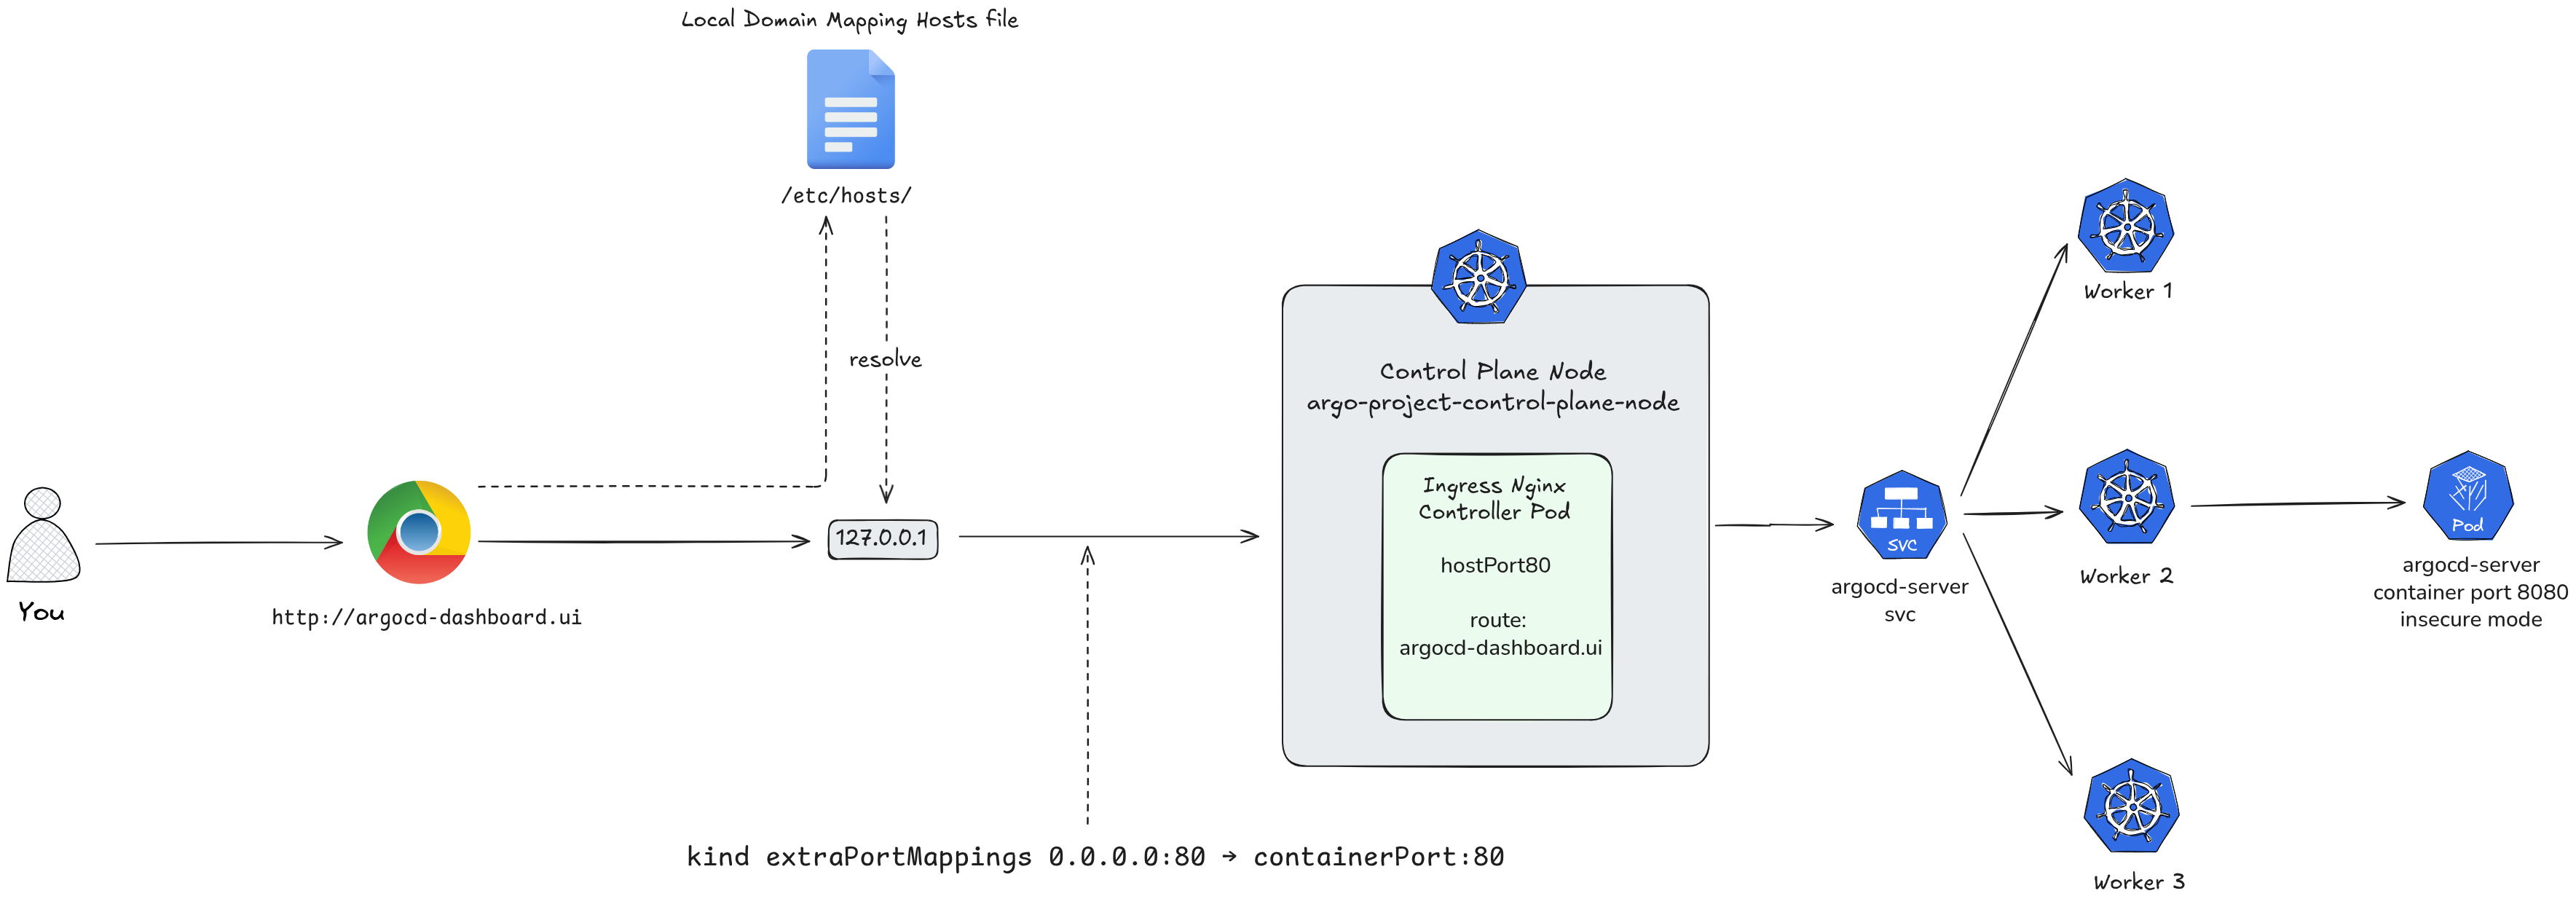
Now, you can update your Argo CD Ingress resource to use argocd-dashboard.ui as the host. When you type http://argocd-dashboard.ui into your browser, your computer will route the traffic straight into your Kind cluster.
How to Update your Ingress with the Test Domain
To apply this to your Argo CD Helm deployment, update your argocd-ingress-values.yaml file with your chosen testing domain:
global:
  domain: argocd-dashboard.ui

configs:
  params:
    server.insecure: true

server:
  ingress:
    enabled: true
    ingressClassName: nginx
    hostname: argocd-dashboard.ui
    annotations:
      nginx.ingress.kubernetes.io/force-ssl-redirect: "false"
global.domain— sets argocd.localhost as the base domain used by the chartconfigs.params.server.insecure: true— runs ArgoCD server in HTTP mode, letting the ingress handle SSL terminationserver.ingress.enabled: true— creates the Ingress resourceserver.ingress.ingressClassName: nginx— targets the nginx ingress controller (standard for kind)server.ingress.hostname: argocd.localhost— the hostname to access the UI
the annotation disables forced SSL redirect since we’re running insecure locally
Then upgrade the chart:
helm install argocd argo/argo-cd -n argocd -f argocd-ingress-values.yaml
Once applied, you can open your browser and navigate directly to your test domain http://argocd-dashboard.ui to access the Argo CD dashboard.
The whole flow of your traffic looks like this now: