The ArgoCD Workshop: A Practical Guide to GitOps Fundamentals
whoami
Salem! (kazakh version of “Hi”) I’m Maxat Akbanov — a DevOps Engineer based in the beautiful city of Almaty, Kazakhstan 🇰🇿. I’ve been working in tech for a while now, and somewhere along the way I became deeply passionate about cloud infrastructure, automation, and making systems that just… work reliably at scale.
My background is rooted in security. I studied Information and Systems Security for my Bachelor’s at the National Technical University of Ukraine in Kyiv, then went on to do my Master’s in Cyber Security at the University of York. During that time I got to dig deep into real-world threats — I even published a few research papers on the WannaCry ransomware. It was intense, but it gave me a perspective on infrastructure that I carry to this day: security isn’t an afterthought, it’s the foundation.
After university, I worked across all kinds of environments — from large Kazakhstani enterprises like Kazakhtelecom, to early-stage startups like ioka.kz, to globally recognized software companies like EPAM and DataArt. Each one taught me something different about how teams build and ship software. I also spent time as an independent consultant, helping clients design and support their cloud workloads on AWS — things like containerized services on EKS and ECS. Working alone, in small teams, in big distributed ones — it’s all shaped how I think about DevOps.
These days I channel everything I’ve learned about GitOps and ArgoCD into this book. I write articles on LinkedIn too, and I try to stay connected with the local tech community — attending conferences and giving talks at the AWS Cloud Club here in Almaty.
Outside of work, you’ll find me playing football or basketball, swimming, hiking in the mountains around Almaty, playing chess, or getting way too invested in an online strategy games. Life’s good.
I speak “Tech,” but I also speak human. My native tongue is Kazakh, and I’m fluent in Russian and English, with Spanish and Turkish currently “loading” in my spare time. Feel free to message me in any language — I promise to try and understand you. If my reply comes back as a mix of five different dialects and a bit of Bash script, just know I’m trying my best!
See you! / Көріскенше! / До встречи! / ¡Hasta luego! / Görüşürüz!
Maxat 😉
P.S. Technology moves fast. If you find an outdated command, concept, diagram or a better way to structure a manifest, section, or chapter, please reach out via my GitHub, Linkedin or email. Your feedback helps make this book better!
Support & Sponsorship
As an independent author, I rely on the support of the community to keep these resources updated and accessible.
If you find this book valuable, I welcome opportunities for support and collaboration to help expand and improve future editions.
I’m open for any of these opportunities:
- Sponsorship and funding
- Technical writing collaborations
- Content review and expert contributions
- Educational or industry partnerships
If you are interested in working together, please reach out with a brief proposal or introduction at:
maxat.akbanov@protonmail.com
Support for this project helps cover research and hosting costs. You can provide support through .

Thank you for supporting accessible technical knowledge.
Preface
Chapter 1: Introduction to GitOps
What is GitOps
GitOps is a modern practice to managing infrastructure and application deployments using Git as the single source of truth. The four core principles of GitOps were introduced by OpenGitOps CNCF Sandbox organization, that maintains a set of open-source standards, best practices, and community-focused education to adopt GitOps approach.
The latest version of the principles can be found at opengitops.dev.
Below is an explanation of each principles, according to the v1.0.0 of the document.
Principle #1. Declarative
A system managed by GitOps must have its desired state expressed declaratively.
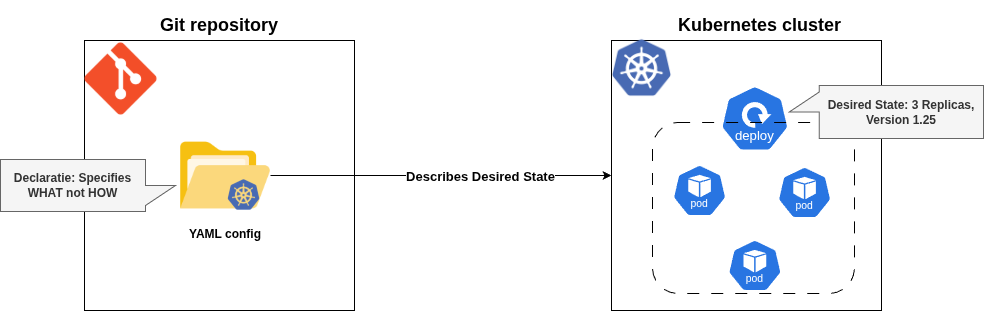
Meaning: The desired state of the system (e.g., infrastructure, applications, configurations) is described in a declarative manner, meaning you specify what the system should look like, not how to achieve it. This is typically done using configuration files (e.g., YAML, JSON) stored in a Git repository.
Implication: Instead of writing step-by-step scripts (imperative approach), you define the end state (e.g., “I want 3 replicas of this application running with this configuration”). The system figures out how to make it happen.
Example: A Kubernetes manifest file declaring a deployment with specific settings (replicas, container images, etc.) is declarative because it describes the desired outcome without specifying the steps to achieve it.
  apiVersion: apps/v1
  kind: Deployment
  metadata:
    name: my-app
    labels:
      app: my-app
  spec:
    replicas: 3
    selector:
      matchLabels:
        app: my-app
    template:
      metadata:
        labels:
          app: my-app
      spec:
        containers:
        - name: my-container
          image: nginx:1.25
          ports:
          - containerPort: 80
The provided sample Kubernetes deployment YAML file does not tell Kubernetes how to create or maintain these pods - Kubernetes takes care of the “how” behind the scenes.
Why it matters: Declarative systems are easier to reason about, reproduce, and audit since the configuration explicitly states the intent.
Principle #2. Versioned and Immutable
Desired state is stored in a way that enforces immutability, versioning and retains a complete version history.
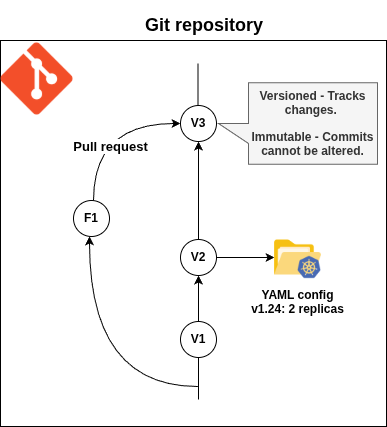
Meaning: The desired state of the system is stored in a Git repository (or similar version control system) where changes are tracked, versioned, and immutable. Once a change is committed, it cannot be altered without creating a new version, and the entire history of changes is preserved.
Implication: Every change to the system’s configuration is recorded as a Git commit, providing a clear audit trail. Immutability ensures that past states can be reliably reproduced or rolled back if needed.
Example: A configuration file in a Git repository is updated via a pull request, committed, and tagged. If a problem occurs, you can revert to a previous commit to restore the earlier state.
Why it matters: Versioning enables traceability, collaboration, and rollback capabilities, while immutability ensures configurations are tamper-proof and consistent.
Principle #3. Pulled Automatically
Software agents automatically pull the desired state declarations from the source.
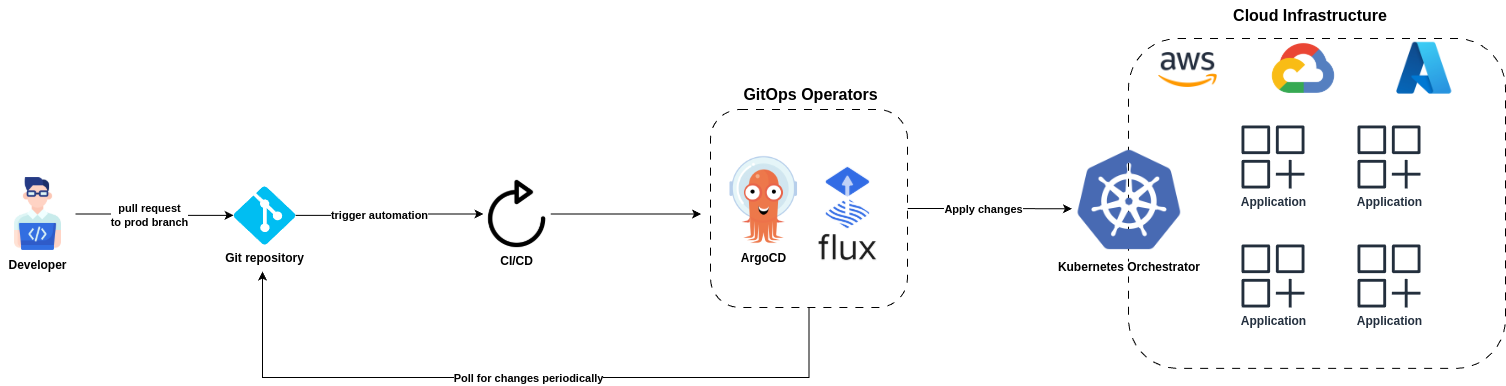
Meaning: Software agents (e.g., GitOps operators like ArgoCD or Flux) automatically retrieve the desired state declarations from the Git repository without manual intervention. These agents “pull” the configuration rather than having it “pushed” to them.
Implication: The system is self-managing to an extent, as the agents continuously monitor the Git repository for changes and apply them to the system. This eliminates the need for manual deployment commands or external orchestration tools pushing changes.
Example: An ArgoCD agent monitors a Git repository, detects a new commit with updated Kubernetes manifests, and applies them to the cluster automatically.
Why it matters: Automated pulling reduces human error, ensures consistency, and enables rapid deployment of changes as soon as they’re committed to Git.
Principle #4. Continuously Reconciled
Software agents continuously observe actual system state and attempt to apply the desired state.
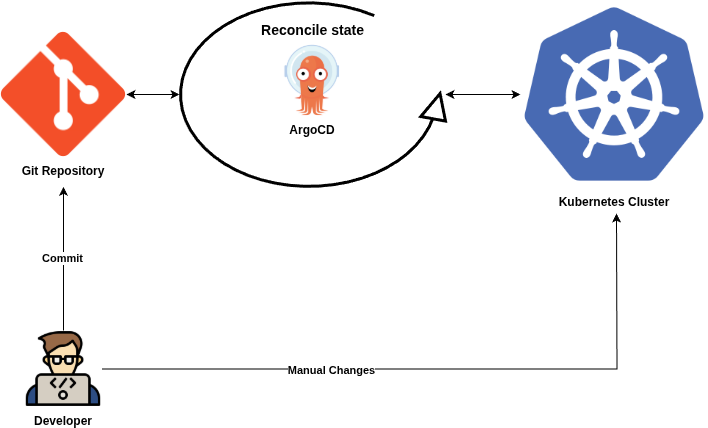
Meaning: Software agents continuously compare the actual state of the system (e.g., what’s running in production) with the desired state defined in the Git repository. If there’s a discrepancy (drift), the agents automatically take action to reconcile the system back to the desired state.
Implication: The system is self-healing, as the agents enforce the declared configuration. For example, if a pod is manually deleted, the agent will recreate it to match the desired state.
Example: If a Kubernetes cluster’s actual state diverges from the Git-defined state (e.g., due to a manual change or failure), the GitOps agent (like Flux) will detect the drift and reapply the correct configuration.
Why it matters: Continuous reconciliation ensures the system remains consistent with the declared intent, improving reliability and reducing manual maintenance.
Together, these principles make GitOps a powerful paradigm for managing infrastructure and applications:
- Declarative ensures clarity and simplicity in defining system states.
- Versioned and immutable provides auditability, reproducibility, and rollback capabilities.
- Pulled automatically enables automation and reduces manual intervention.
- Continuously reconciled ensures the system is always aligned with the desired state, enhancing reliability and self-healing.
By leveraging Git as the source of truth and automating the application of changes, GitOps streamlines operations, improves collaboration, and aligns with DevOps practices like CI/CD and infrastructure-as-code.
Tools in the GitOps Space
In the GitOps ecosystem there are two major competing tools:
Flux
Flux is an open-source tool originally created by Weaveworks (also coined the term “GitOps”) that keeps Kubernetes clusters in sync with configuration sources (like Git repositories). It is one of the two “heavyweights” in the GitOps world, alongside ArgoCD.
At it’s core Flux is a set of controllers for Kubernetes that automates the deployment of your infrastructure and applications. When you push a change to Git, Flux “sees” it and automatically applies that change to your cluster.
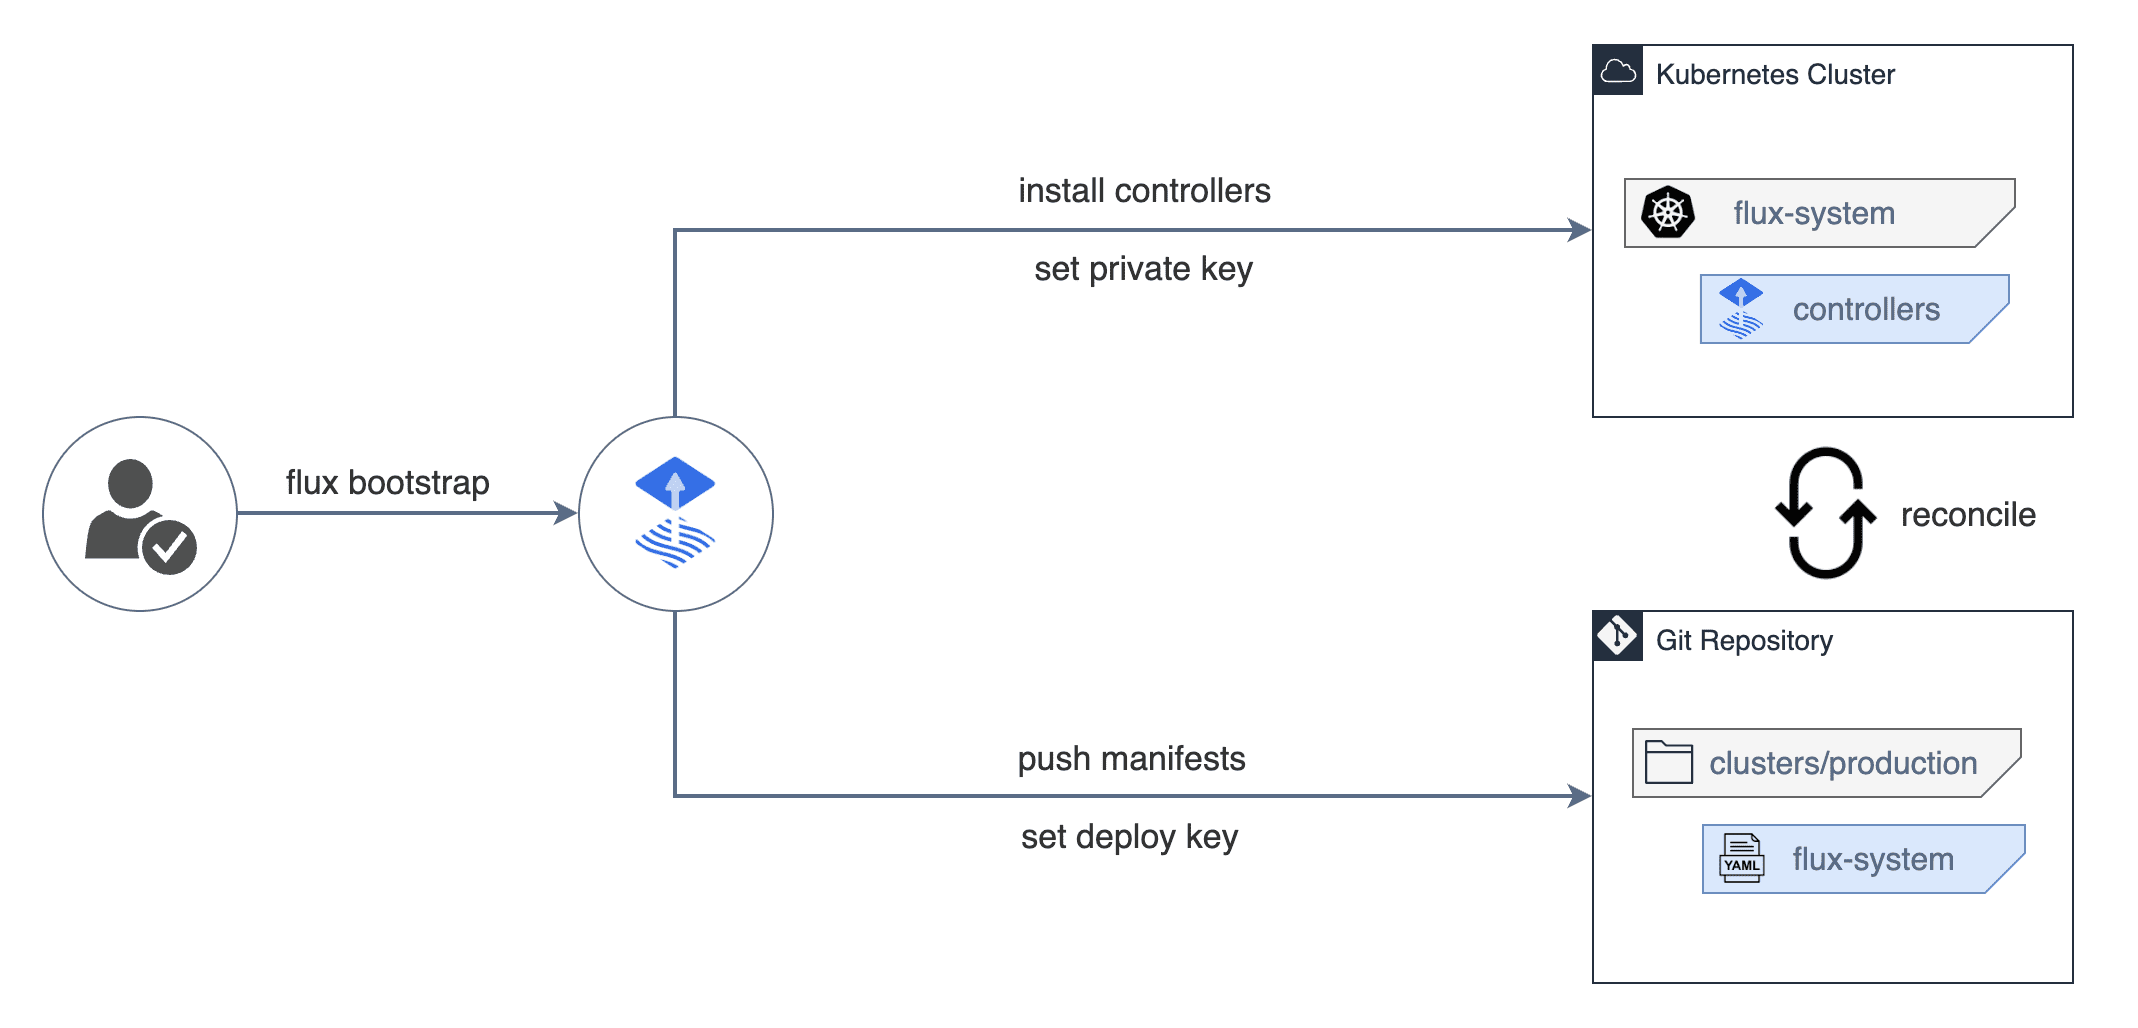 Image source: Official FluxCD Website
Key Features of Flux
- Automated Updates: It doesn’t just pull changes from Git; it can also scan your Container Registry for new images and automatically update your Git manifests to use the new version.
- Modular Design: It is built using the GitOps Toolkit, meaning it is composed of several small controllers (Source Controller, Kustomize Controller, Helm Controller, Notification Controller, Image reflector and automation controllers) rather than one giant “monolith” application.
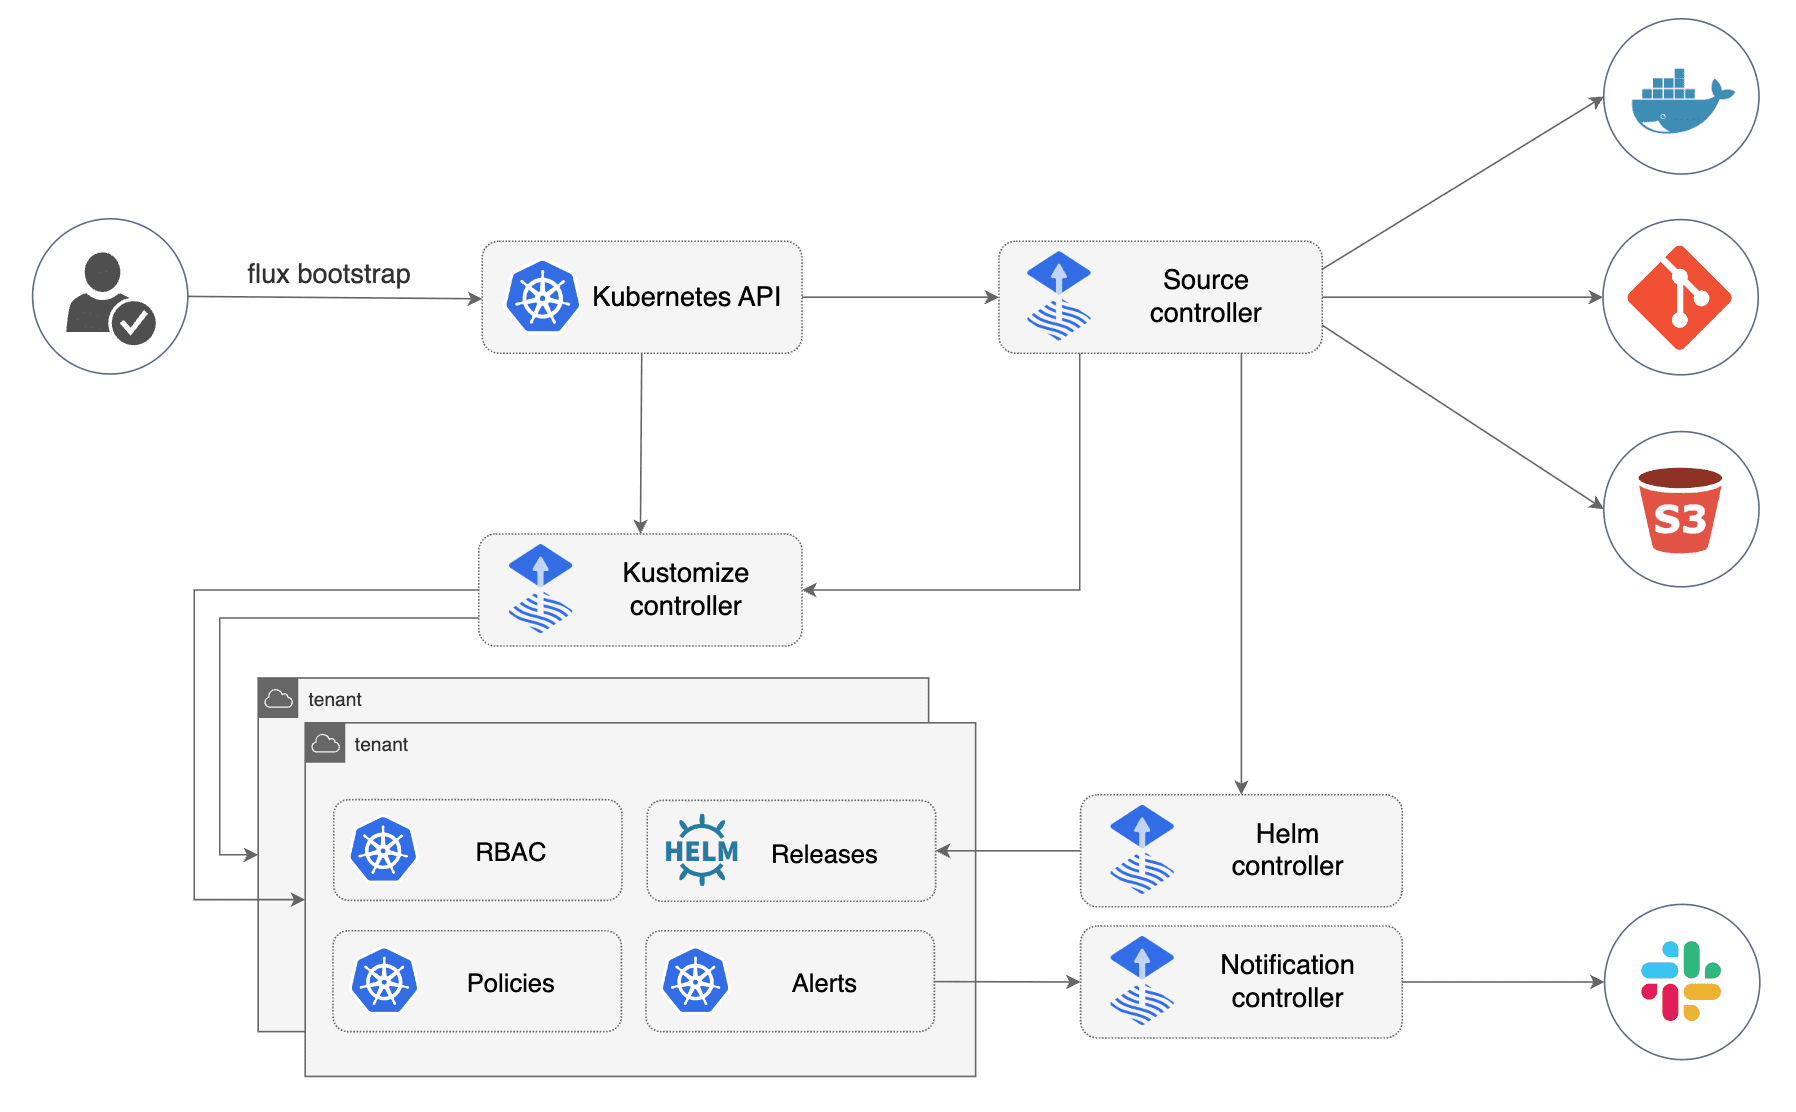 Image source: Official FluxCD Website
- New UI: Not so long ago Flux existed only as CLI-tool without any UI. On 27 February 2024 Flux announced a new general purpose UI.
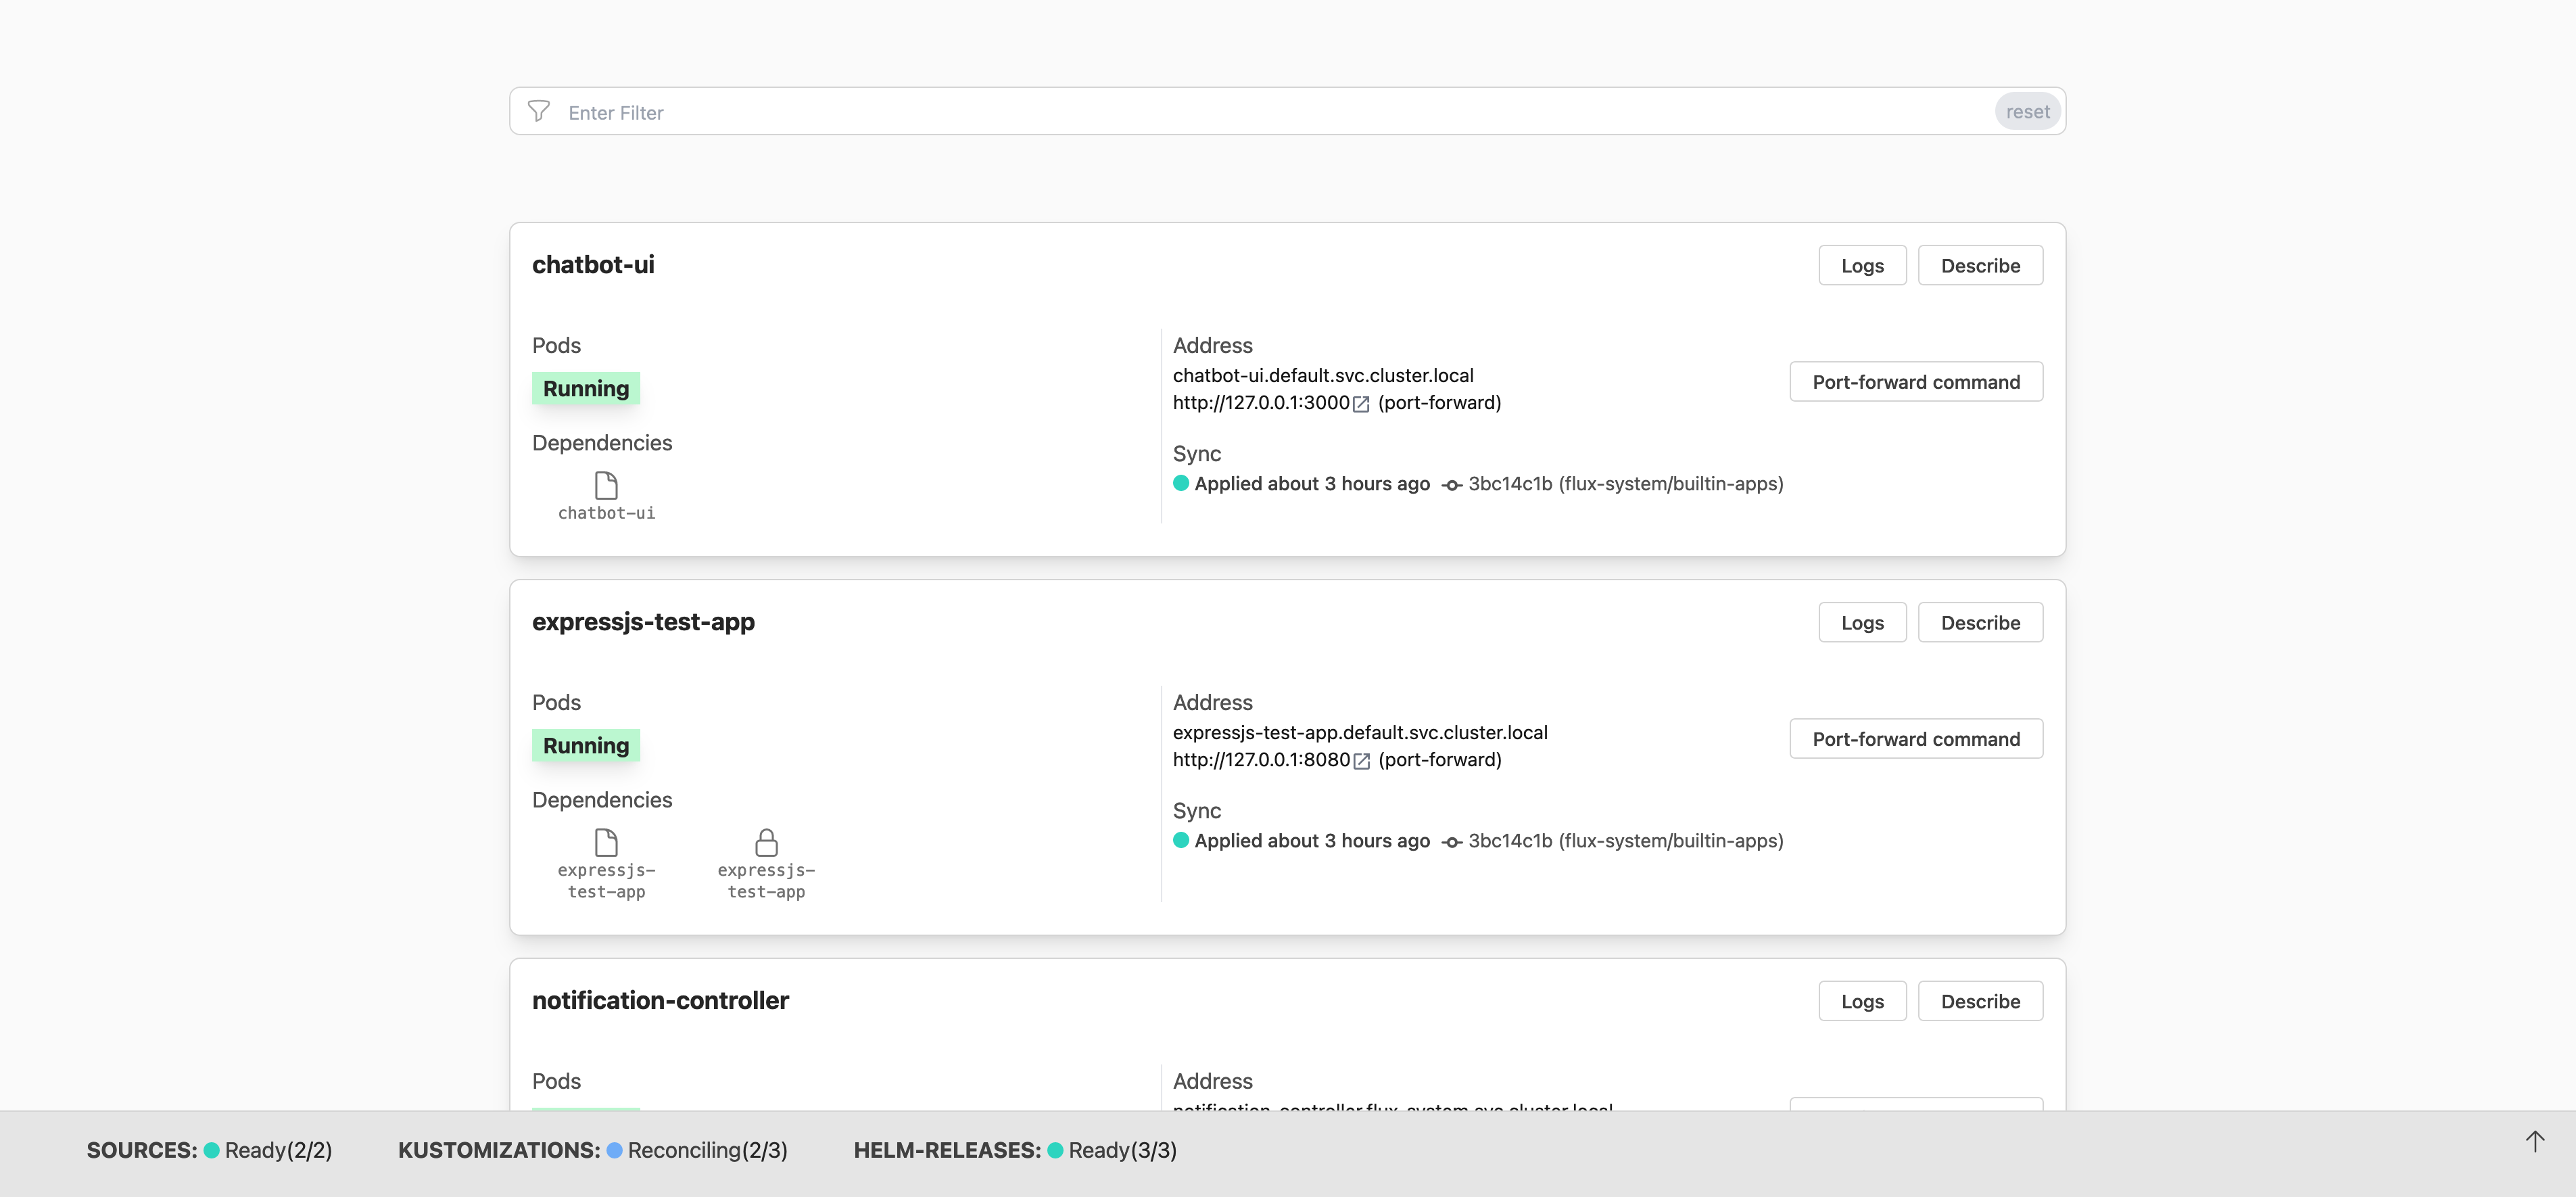 Image source: FluxCD Blog
You typically choose Flux if you prefer a “set it and forget it” approach where the cluster manages itself without needing a dashboard, or if you are running many small, resource-constrained clusters (like at the “Edge”) where a heavy UI isn’t practical.
ArgoCD
ArgoCD is an open-source declarative, GitOps continuous delivery tool for Kubernetes, created by Intuit in 2018 and donated to the CNCF (where it graduated in 2022). It is part of the broader Argo Project, which also includes Argo Workflows, Argo Events, and Argo Rollouts.
Unlike Flux’s operator-centric, modular philosophy, ArgoCD is built around a central concept: the Application — a Kubernetes CRD that maps a Git source to a target cluster and namespace. Everything you do in ArgoCD revolves around defining, syncing, and observing Applications.
Key Features of ArgoCD
- Rich Web UI (first-class citizen): Unlike Flux where the UI was an afterthought, ArgoCD was designed with a powerful UI from day one. It provides a real-time visual graph of your application’s resource tree — you can see deployments, pods, services, and their health status at a glance, all live-updating.
 Image source: ArgoCD Official Website
- Multi-cluster Management: ArgoCD is built for managing many clusters from a single control plane. You register external clusters and deploy Applications to them centrally. This makes it a natural fit for platform teams operating at scale.
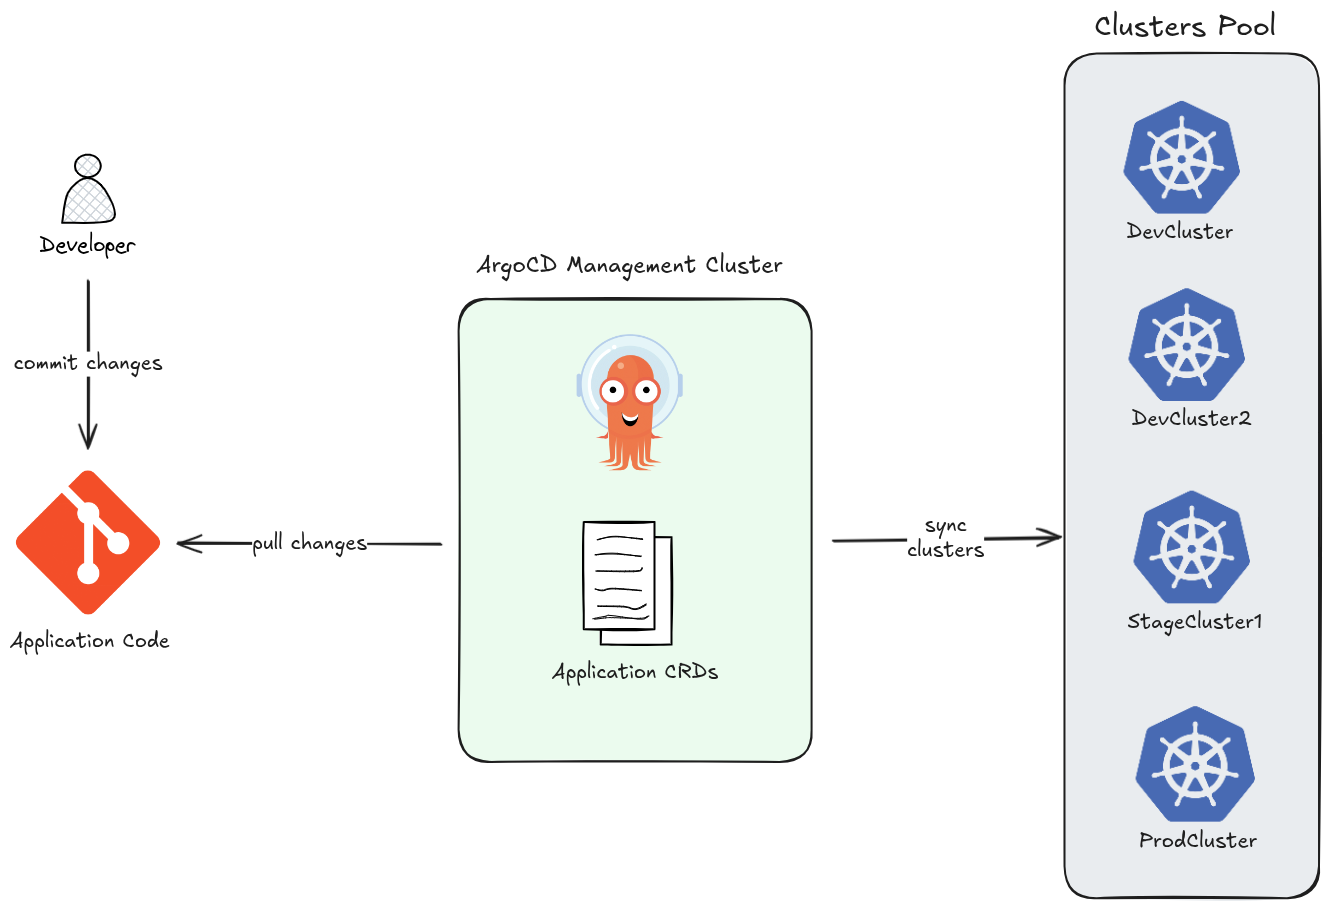
- ApplicationSet — at-scale templating: The ApplicationSet controller lets you generate many ArgoCD Applications from a single template using generators (Git directories, cluster lists, pull requests, etc.). This enables patterns like “deploy this app to every cluster” with a few lines of YAML.
-
Sync Strategies and Hooks: ArgoCD supports fine-grained control over how deployments happen. You can define
PreSync,Sync, andPostSynchooks for complex rollout sequences — enabling blue/green and canary deployments within the GitOps model. -
Manual Sync with Approval Gates: Unlike Flux which leans toward full automation, ArgoCD lets you configure sync to be manual — meaning a human reviews and approves the sync through the UI or CLI before changes land in the cluster. This is valuable in regulated or production-critical environments.
-
Broad Config Management Support: ArgoCD natively supports Kustomize, Helm, Jsonnet, plain YAML directories, and custom plugins — without needing separate controllers for each.
-
SSO and RBAC out of the box: ArgoCD has built-in support for SSO via Auth0, OIDC, KeyCloak, OAuth2, LDAP, SAML 2.0, GitHub Actions, and more. Combined with its RBAC system, it gives platform teams fine-grained access control over who can see and sync what.
Flux vs ArgoCD — Where Each Fits
| Flux | ArgoCD | |
|---|---|---|
| Primary interface | CLI + GitOps | UI + CLI |
| Architecture | Modular controllers | Monolithic application |
| Multi-cluster | Possible but complex | First-class feature |
| Sync control | Automated by default | Automated or manual |
| Image automation | Built-in | Not built-in (separate tooling needed) |
| Scale | Great for edge / constrained clusters | Great for centralized platform teams |
| Learning curve | Lower (YAML-native) | Slightly higher (ArgoCD-specific concepts) |
You typically choose Flux if you want a lightweight, Git-native operator where the cluster manages itself — especially for edge deployments or teams that live entirely in the terminal.
You choose ArgoCD when you need visibility, control, and multi-cluster management — a central dashboard your whole team can use, manual approval gates, and the ability to manage dozens of clusters from one place.
References
- OpenGitOps: GitOps Principles v1.0.0
- The NewStack Blog: 4 Core Principles of GitOps
- github.com/argoproj/argo-cd
- github.com/argoproj/argocd-example-apps
Chapter 2: ArgoCD Overview
When engineers first encounter Argo CD, they often arrive with a mental model shaped by imperative CI systems — pipelines that hold state, queue jobs, and accumulate context over time. Argo CD operates on an entirely different principle. It does not accumulate. It reconciles.
Key Patterns of ArgoCD
The Stateless Reconciler
At its core, Argo CD is a Kubernetes controller. Like all controllers in the Kubernetes ecosystem, it runs a continuous reconciliation loop: observe the current state of the cluster, compare it against the desired state declared in Git, and act to close any gap. No step in this loop requires knowledge of a previous loop iteration.
This is the essence of stateless design. Argo CD’s application controller holds no in-memory queue of “what happened before.” Each sync cycle begins by reading directly from two authoritative sources of truth: the Git repository and the live Kubernetes API. If the controller pod is killed and restarted, it resumes reconciling as if nothing happened — because nothing meaningful was lost.
The practical consequences of statelessness are significant. Argo CD instances can be scaled horizontally, replaced, or upgraded without coordination ceremonies. A new replica does not need to “catch up” — it simply starts reconciling. There is no master node, no write-ahead log to replay, no session to hand off.
Note on persistence
Argo CD does write records — application objects, sync history, RBAC configuration — to Kubernetes resources (primarilyConfigMapsandSecrets). But these are durable Kubernetes objects, not application memory. The controller itself remains stateless; its data lives inetcd, not in the process.
Declarative Self-Management
A system that enforces GitOps for application workloads should, in principle, manage its own
configuration the same way. Argo CD supports exactly this: its own operational configuration —
repositories, clusters, projects, and even its own Application resources — can be expressed
declaratively and stored in Git. This is often referred to as “Recursive GitOps” or the “App-of-Apps” pattern. In this setup, Argo CD treats itself as just another application, closing the loop between the desired state in Git and the live state of the cluster.
Extensibility
Argo CD provides a flexible framework that adapts to diverse engineering requirements. This extensibility ensures that the platform can manage various configuration formats and integrate with existing infrastructure without requiring significant architectural changes.
Multiple Source Integration
Argo CD supports multiple repository types, allowing teams to source GitOps content from more than just standard Git providers. It natively connects to Helm repositories and OCI registries, providing the flexibility to pull configurations from the specific version control or storage systems that an organization already utilizes.
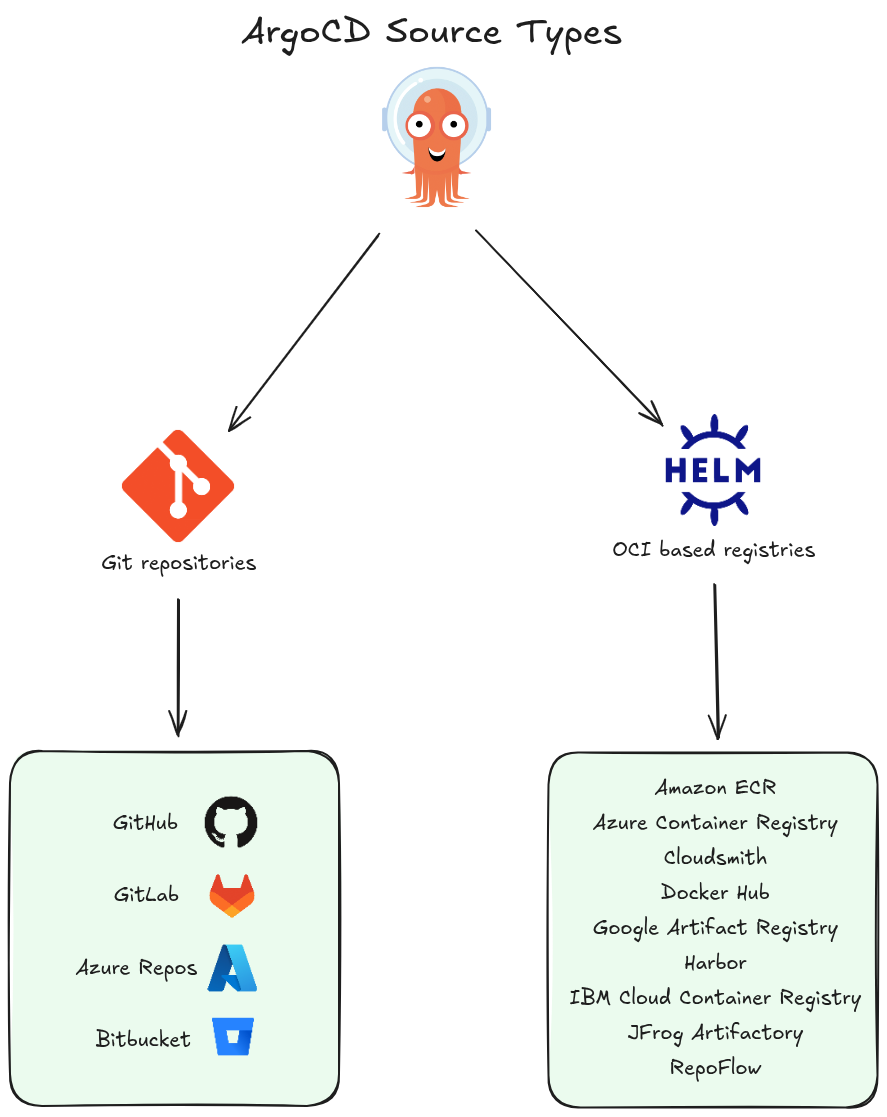
Native Templating Support
To simplify the management of Kubernetes manifests, Argo CD includes built-in support for popular templating tools such as:
The platform automatically recognizes these formats and renders them into valid Kubernetes YAML, allowing developers to use their preferred configuration languages without manual intervention.
Custom Extensions
For specialized needs, users can add custom tools to the Argo CD environment. These user-defined integrations allow the platform to interact with external resources or apply advanced logic during the rendering process. This capability ensures that Argo CD can scale to meet unique organizational requirements and complex deployment scenarios.
ArgoCD Architecture
Under the hood, ArgoCD uses microservices architecture in it’s design, where each component runs as a separate standalone service responsible for a specific task.
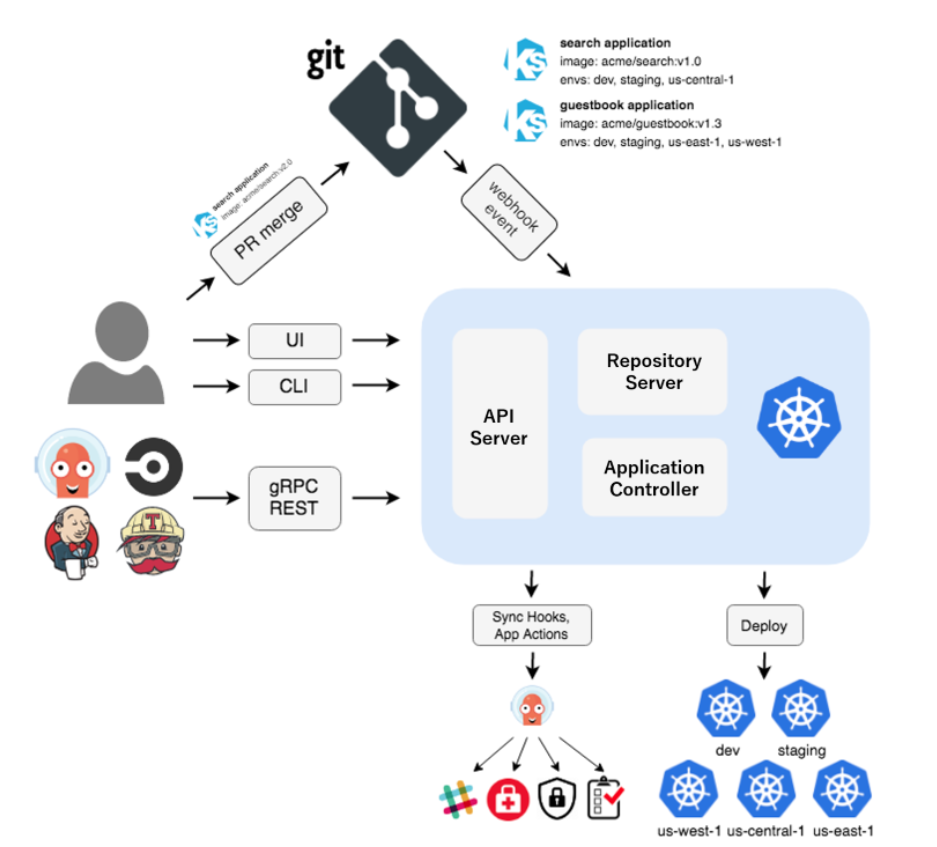 Image source: Official ArgoCD Docs Website
All ArgoCD internal components can be categorized into the following 4 logical sections:
- UI: The entry point where users interact with the system via the Web interface or CLI.
- Application: The logic layer that bridges the UI with backend operations, providing the necessary APIs and management capabilities.
- Core: The “brain” of the operation, containing the Kubernetes controllers and GitOps logic that synchronize desired and live states.
- Infra: The underlying dependency layer, including external tools and databases that provide the foundational infrastructure for Argo CD to run.
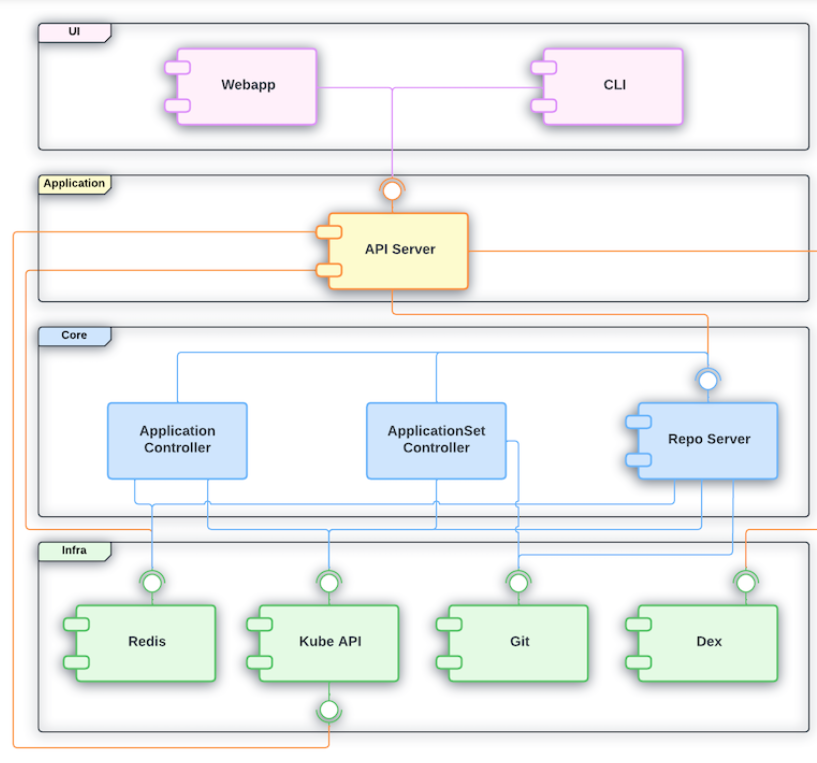 Image source: Official ArgoCD Docs Website
If we look closely under the hood of the ArgoCD engine we will see the following core components:
API Server
API Server (argocd-server)
The central control plane — exposes a gRPC/REST API consumed by the Web UI, CLI, and CI/CD systems. Handles authentication, RBAC enforcement, and delegates operations to other components.
Repository Server
Repository Server (argocd-repo-server)
Manages Git repository interactions. It clones repos, renders manifests (Helm, Kustomize, Jsonnet, plain YAML), and caches results. It’s stateless and can be scaled horizontally.
Application Controller
Application Controller (argocd-application-controller)
The heart of ArgoCD — a Kubernetes controller that continuously watches live cluster state vs. desired Git state. It detects drift (OutOfSync) and triggers sync operations. Runs as a StatefulSet for sharding support.
ApplicationSet Controller
ApplicationSet Controller (argocd-applicationset-controller)
Automates the creation of multiple Application resources using generators (Git, cluster, matrix, list, etc.). Useful for multi-cluster or multi-tenant deployments.
Dex
Dex (argocd-dex-server)
An embedded OIDC identity provider used for SSO integration. Bridges ArgoCD with external identity providers like GitHub, LDAP, SAML, and Google.
Redis
Redis (argocd-redis)
Used as a caching layer and for storing temporary state. The API Server and Application Controller rely on it heavily to reduce load on the Kubernetes API and Git repos.
Notifications Controller
Notifications Controller (argocd-notifications-controller)
Sends alerts and notifications (Slack, email, PagerDuty, etc.) based on Application events like sync failures or health changes.
The Application Controller + Repo Server pair is the core engine — everything else supports observability, access control, or automation around them.
How ArgoCD Components Interact
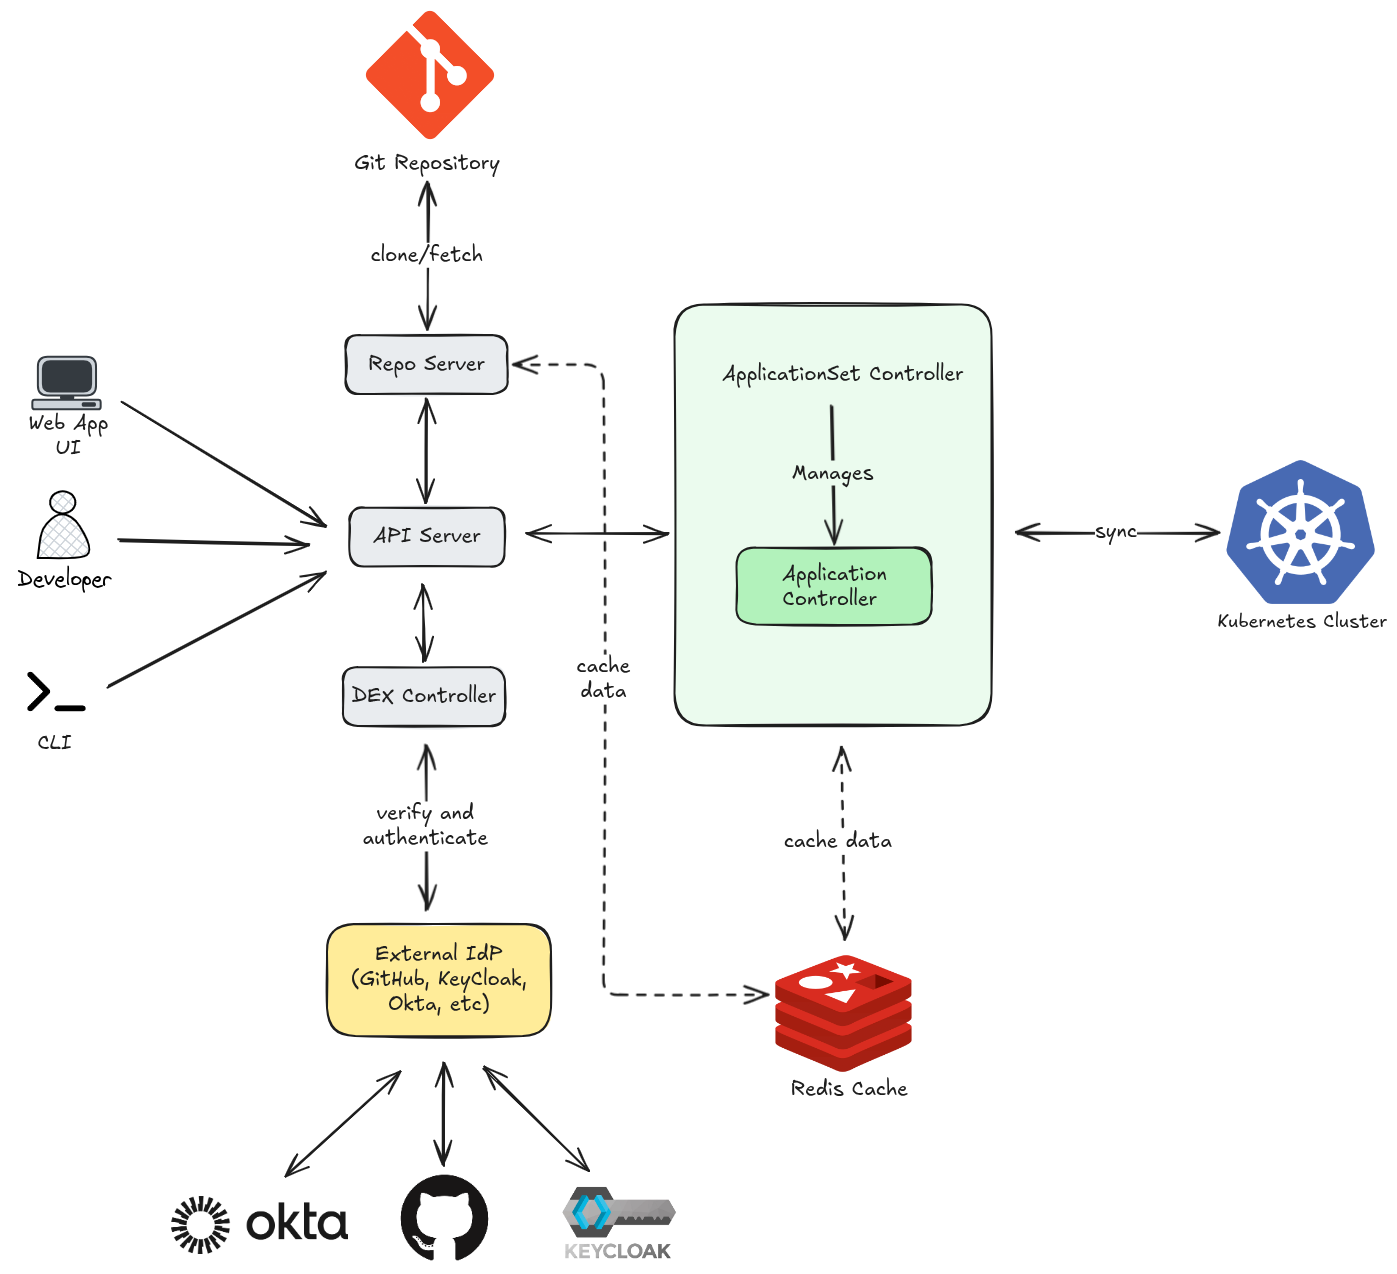
- You (or a CI pipeline) sends a request — e.g. “sync this app” via UI, CLI, or webhook
- API Server authenticates you via DEX component, checks RBAC, then forwards the intent to the Application Controller or ApplicationSet Controller
- Application Controller figures out what needs to change and applies it
- Kubernetes Cluster receives the final manifests and runs them
When the API Server needs to know what the app should look like, it asks the Repo Server:
- API Server delegates manifest rendering to the Repo Server
- Repo Server clones/fetches the Git repo, renders the manifests (Helm/Kustomize/YAML)
- Git Repo is the source of truth — the desired state lives here
The Repo Server also caches rendered manifests to avoid hitting Git on every request.
The Application Controller constantly compares live state (cluster) vs desired state (Git):
- It caches cluster state and sync results in Redis to avoid hammering the Kubernetes API
- Redis also stores temporary session data for the API Server
- Without Redis, every comparison would require a full cluster re-query
Putting It All Together — A Sync Example
| Step | What Happens |
|---|---|
| 1 | You click “Sync” in the UI |
| 2 | API Server authenticates + authorizes you |
| 3 | API Server asks Repo Server for the latest manifests from Git |
| 4 | Repo Server fetches from Git and renders them |
| 5 | Application Controller compares rendered manifests vs live cluster state (using Redis cache) |
| 6 | Controller applies the diff to the Kubernetes Cluster |
| 7 | Cluster state is updated and cached back in Redis |
The key insight: Git is always the source of truth. ArgoCD’s entire job is to make the cluster match what Git says — every arrow in the diagram serves that goal.
References
Chapter 3: Installing ArgoCD
Like many GitOps solutions, Argo CD serves various users with distinct business goals. Because requirements vary so widely, the platform offers several installation configurations. Choosing the right one depends on five key factors:
- User Base: Who are the primary users and consumers?
- Management Scope: What specific infrastructure or applications will Argo CD oversee?
- Availability: Is high availability (HA) a critical requirement for your operations?
- Security: What are the mandatory security and compliance standards?
- Automation: What are your specific needs for bootstrapping and automated workflows?
ArgoCD offers two main installation types depending on your use case:

Core Installation
This is a minimal, lightweight installation intended for users who only need the core GitOps sync functionality without the full ArgoCD UI or API server.
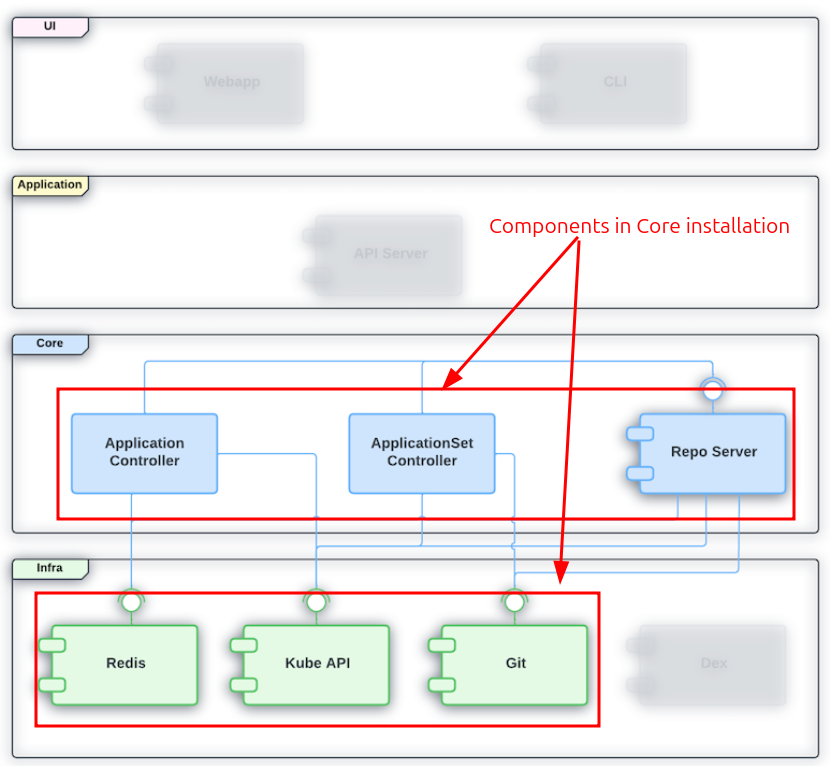 Image source: Official ArgoCD Docs Website
Key characteristics:
- Installs only the essential components: the application controller, repo server, and ApplicationSet controller
- No API server, no UI, no Dex (authentication server), a minimal version of Redis
- Intended for cluster admins managing their own cluster, not for multi-tenant or team-shared setups
- Interaction happens via the
argocdCLI (usingargocd admincommands) orkubectldirectly — not through the web UI - Lower resource footprint, simpler attack surface
Best for: Single-tenant, admin-only usage where you want ArgoCD purely as a sync engine with no web interface.
Default (Full) Installation
This is the standard, full-featured installation most teams use. It includes everything needed to operate ArgoCD as a shared platform.
Image source: Official ArgoCD Docs Website
Key characteristics:
- Installs all components: API server, UI, repo server, application controller, ApplicationSet controller, Dex (SSO), Redis (for caching)
- Exposes the web dashboard and the full REST/gRPC API
- Supports multi-tenancy — multiple teams or users can log in, manage projects, and interact with their own apps
- Supports SSO via Dex (integration with GitHub, LDAP, OIDC providers, etc.)
- Higher resource usage, but far richer feature set
Best for: Teams and organizations that want a shared GitOps platform with a UI, RBAC, SSO, and API access.
Use Core if you want a lean sync engine you manage via CLI, and Default if you want the full ArgoCD experience with a UI and team collaboration features.
ArgoCD Operating Modes
Cluster-Scoped Mode (Internal & External Clusters)
This is the default operating mode when ArgoCD is installed with cluster-wide permissions.
Internal Cluster:
ArgoCD can deploy to the same cluster it runs in. This cluster is registered automatically and is referred to as https://kubernetes.default.svc — the in-cluster API server address. No extra registration is needed; it’s available out of the box.
External Clusters:
ArgoCD can also manage remote Kubernetes clusters outside of where it’s installed. These are registered explicitly using:
argocd cluster add <context-name>
This creates a ServiceAccount with the necessary permissions in the target cluster and stores the credentials as a Secret in ArgoCD’s namespace.
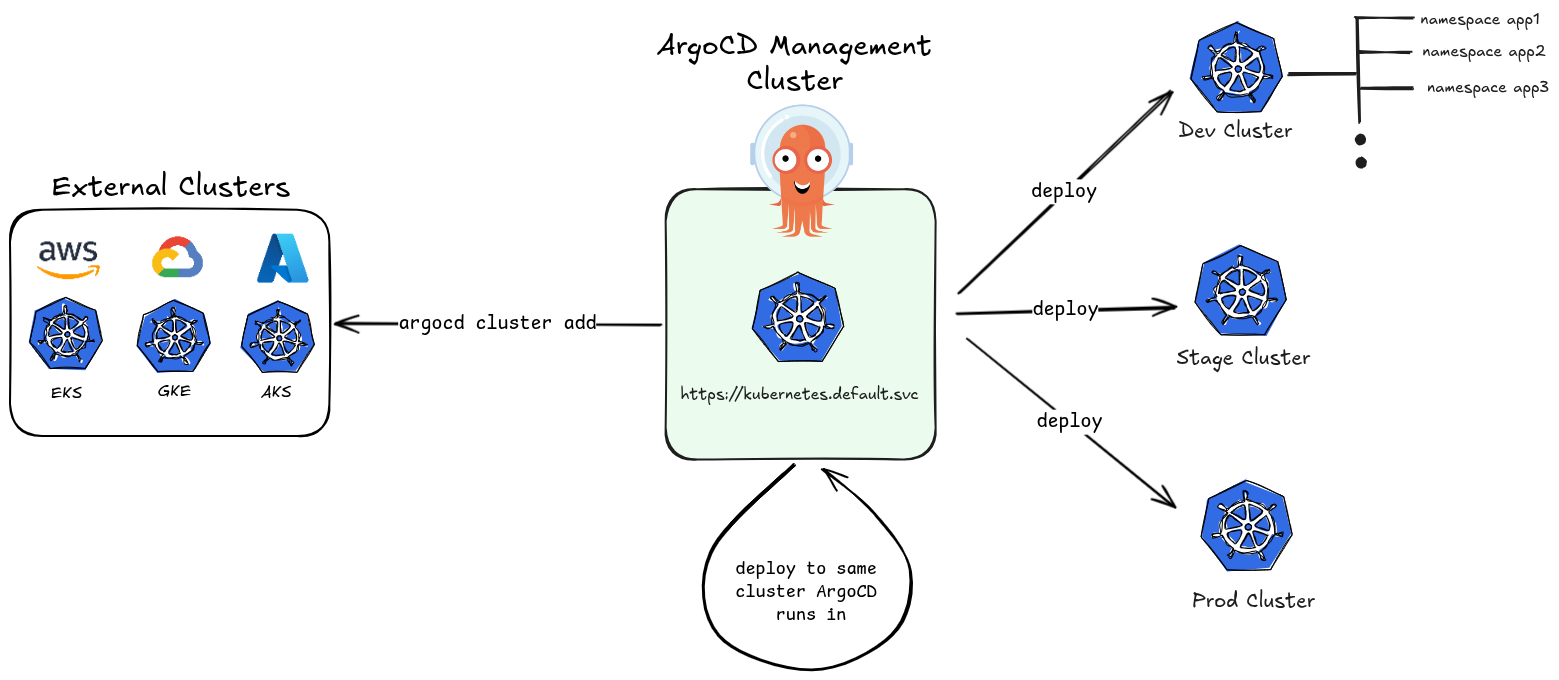
Key characteristics:
- ArgoCD has cluster-admin level permissions (via
ClusterRole) - It can manage resources across all namespaces of any registered cluster
- One ArgoCD instance can act as a central control plane managing dozens of clusters
- Suitable for platform/ops teams managing infrastructure at scale
Namespaced Mode
This is a restricted operating mode where ArgoCD’s permissions are limited to a specific namespace rather than the entire cluster.
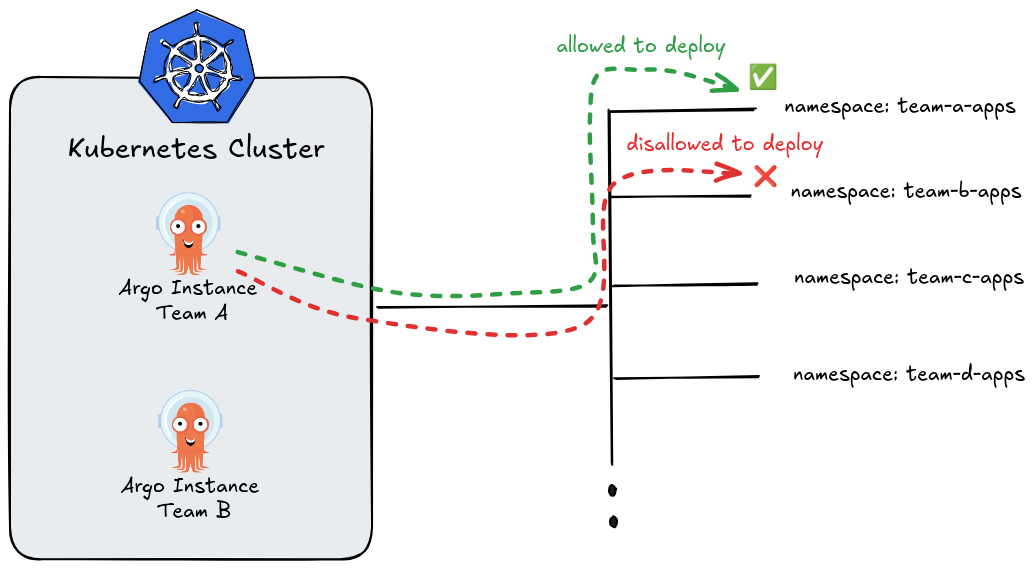
Key characteristics:
- ArgoCD only gets
Role(notClusterRole) — scoped to one namespace - It can only manage resources within its own namespace
- Multiple ArgoCD instances can run side by side in the same cluster, each in its own namespace, without interfering with each other
- Each team or tenant can have their own isolated ArgoCD instance
- Cannot register or manage external clusters (no cluster-level secret access)
Installed using:
kubectl apply -n my-namespace -f https://raw.githubusercontent.com/argoproj/argo-cd/stable/manifests/namespace-install.yaml
For more information, see github.com/argoproj/argo-cd/tree/master/manifests
Quick Comparison
| Feature | Cluster-Scoped | Namespaced |
|---|---|---|
| Permission scope | Cluster-wide (ClusterRole) | Single namespace (Role) |
| Manages external clusters | ✅ | ❌ |
| Manages in-cluster | ✅ (all namespaces) | ✅ (own namespace only) |
| Multi-tenancy isolation | Limited | Strong |
| Multiple instances per cluster | Not typical | ✅ Common pattern |
| Best for | Central platform teams | Per-team isolated deployments |
Use Cluster-Scoped mode when you need a centralized ArgoCD managing many clusters, and Namespaced mode when you want strong isolation between teams sharing a single cluster.
Creating Kubernetes Cluster
💡 PRACTICE
To access code files go to Chapter 2
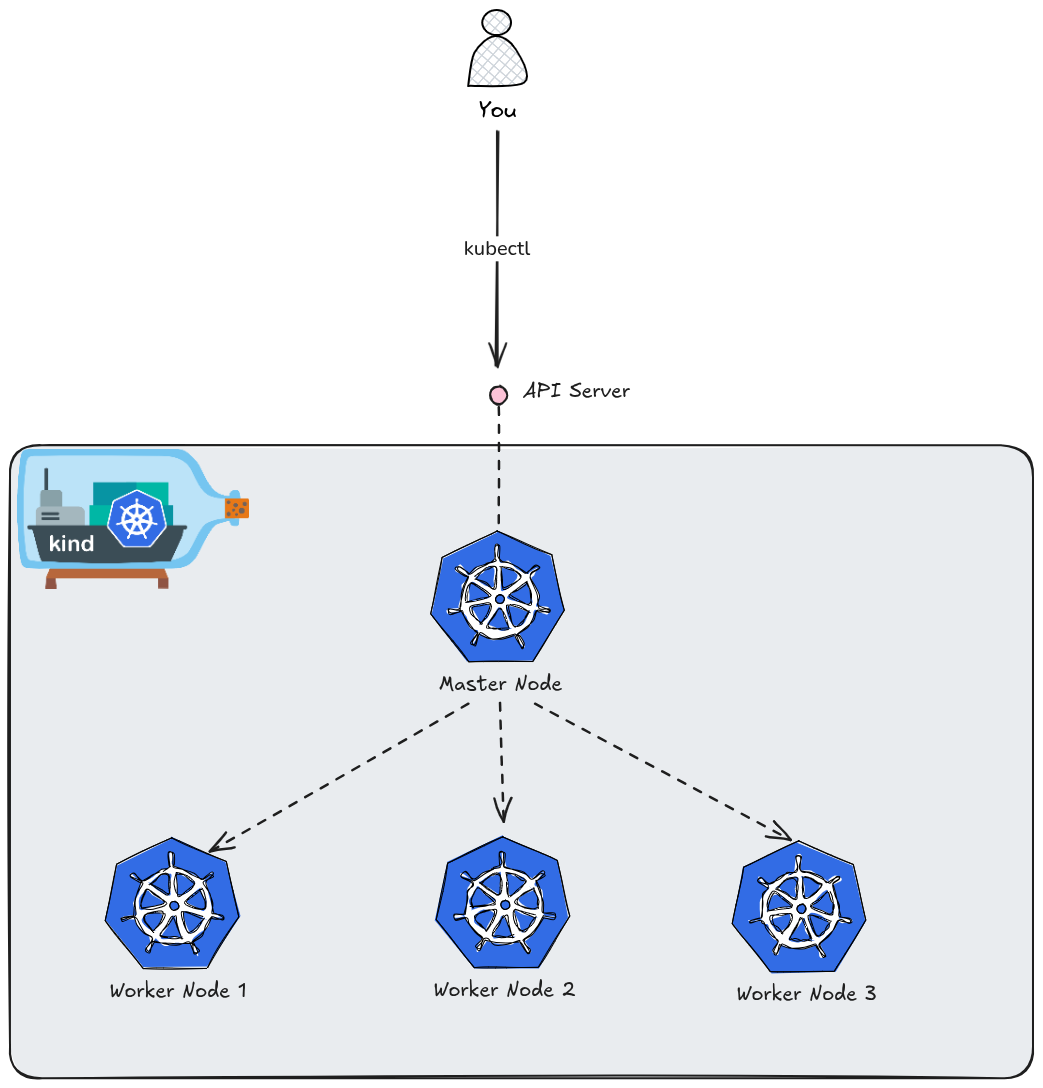
For our examples we will use kind tool to create Kubernetes cluster.
To create a specific multi-node configuration in Kind, you need to move beyond simple CLI flags and use a YAML configuration file.
By default, Kind creates a single-node cluster. For our setup we will use your 1 Control Plane (Master) and 3 Worker nodes:
Create the kind Configuration File
Create a file named kind-config.yaml. This file defines the topology of your cluster.
kind: Cluster
apiVersion: kind.x-k8s.io/v1alpha4
nodes:
  # The one master node (control-plane)
  - role: control-plane
  # The three worker nodes
  - role: worker
  - role: worker
  - role: worker
Create the Named Cluster
Run the following command to spin up the cluster. The --name flag allows you to give it a custom identifier (e.g., my-custom-cluster), and the --config flag points to the YAML file you just created.
kind create cluster --name my-custom-cluster --config kind-config.yaml
Verify the Nodes
Once the process finishes, verify that all four nodes (1 control-plane + 3 workers) are up and running:
kubectl get nodes
Expected Output:
NAME                                STATUS   ROLES           AGE   VERSION
my-custom-cluster-control-plane     Ready    control-plane   1m    v1.35.0
my-custom-cluster-worker            Ready    <none>          1m    v1.35.0
my-custom-cluster-worker2           Ready    <none>          1m    v1.35.0
my-custom-cluster-worker3           Ready    <none>          1m    v1.35.0
Tips for Multi-Node Kind Clusters
- Resource Usage: Remember that each “node” is actually a Docker container. Running four nodes will consume significantly more RAM and CPU than a single-node setup. Ensure your Docker Desktop or Docker Engine has at least 8GB of RAM allocated.
- Context Switching: If you have multiple Kind clusters, you can switch between them using:
kubectl config use-context kind-my-custom-cluster - Deleting the Cluster: When you’re done, clean up everything with:
kind delete cluster --name my-custom-cluster
Installing ArgoCD via Helm
To install Argo CD via Helm, you will use the official community-maintained repository. Helm is the preferred method for many because it makes managing updates and customizing configurations (like cluster-scoped vs. namespace-scoped) much easier than raw manifests.
Add the Argo Helm Repository
First, add the repository to your local Helm client and update it to ensure you have the latest chart versions.
helm repo add argo https://argoproj.github.io/argo-helm
helm repo update
Configure for Cluster-Scoped Mode (Default)
By default, the Argo CD Helm chart installs in cluster-scoped mode. This means the Argo CD controller has a ClusterRole and can manage resources across the entire cluster.
If you want to verify or customize settings, you can create a values.yaml file, but for a standard installation, the default values are sufficient.
Install the Chart
Create the namespace and install the chart. We will name the release argocd.
# Create the namespace
kubectl create namespace argocd

# Install the chart
helm install argocd argo/argo-cd --namespace argocd
You should see output similar to this:
NAME: argocd
LAST DEPLOYED: Thu May 14 21:03:57 2026
NAMESPACE: argocd
STATUS: deployed
REVISION: 1
TEST SUITE: None
NOTES:
In order to access the server UI you have the following options:

1. kubectl port-forward service/argocd-server -n argocd 8080:443

    and then open the browser on http://localhost:8080 and accept the certificate

2. enable ingress in the values file `server.ingress.enabled` and either
      - Add the annotation for ssl passthrough: https://argo-cd.readthedocs.io/en/stable/operator-manual/ingress/#option-1-ssl-passthrough
      - Set the `configs.params."server.insecure"` in the values file and terminate SSL at your ingress: https://argo-cd.readthedocs.io/en/stable/operator-manual/ingress/#option-2-multiple-ingress-objects-and-hosts


After reaching the UI the first time you can login with username: admin and the random password generated during the installation. You can find the password by running:

kubectl -n argocd get secret argocd-initial-admin-secret -o jsonpath="{.data.password}" | base64 -d

(You should delete the initial secret afterwards as suggested by the Getting Started Guide: https://argo-cd.readthedocs.io/en/stable/getting_started/#4-login-using-the-cli)
As output suggests don’t forget to delete the initial secret afterwards. For more information, see Getting Started Guide.
With kubectl get po -n argocd you can verify that all ArgoCD components are running as pods in argocd namespace:
NAME                                                READY   STATUS    RESTARTS   AGE
argocd-application-controller-0                     1/1     Running   0          20m
argocd-applicationset-controller-8466bbdf48-gx7sw   1/1     Running   0          20m
argocd-dex-server-5b97f65bfd-rsrkw                  1/1     Running   0          20m
argocd-notifications-controller-68767c8f58-shngh    1/1     Running   0          20m
argocd-redis-75fb94c8-44xg8                         1/1     Running   0          20m
argocd-repo-server-6c684bd96b-vwfl2                 1/1     Running   0          20m
argocd-server-599cd4fb9c-tpnrd                      1/1     Running   0          20m
As you can see all ArgoCD internal components for a full installation type are running in pods.
When you install Argo CD in this mode, the Helm chart sets up several components that interact to sync your Git repository to your Kubernetes cluster.
Common Helm Customizations
If you want to modify the installation during the helm install command, you can use the --set flag. Here are a few common examples:
- To enable the Ingress (if you have an ingress controller):
--set server.ingress.enabled=true
or enable ingress in the values file server.ingress.enabled and either:
- Add the annotation for ssl passthrough: https://argo-cd.readthedocs.io/en/stable/operator-manual/ingress/#option-1-ssl-passthrough
- Set the
configs.params."server.insecure"in the values file and terminate SSL at your ingress: https://argo-cd.readthedocs.io/en/stable/operator-manual/ingress/#option-2-multiple-ingress-objects-and-hosts
- To change the service type to LoadBalancer:
--set server.service.type=LoadBalancer
- To disable the initial admin password secret (not recommended for production):
--set configs.secret.createSecret=false
Using Custom Helm Values File
To see the available configuration options for the Argo CD Helm chart, you have two primary methods.
Method 1: The Helm CLI
You can extract the default values.yaml directly from the repository you added earlier without downloading the whole chart package.
helm show values argo/argo-cd > argocd-values.yaml
This command takes the default values, redirects them into a file named argocd-values.yaml, and saves it in your current directory.
Method 2: GitHub
If you prefer a searchable web interface with syntax highlighting, you can view the values.yaml file directly in the official argo-helm repository:
What to Look For in the File
The values.yaml for Argo CD is quite large (often over 2,000 lines) because it is highly configurable. Here are the key sections you might want to inspect:
global:Settings that apply to all components, like image registry mirrors or global labels.server:Configuration for the UI and API, including ingress, service type, and RBAC.controller:Settings for the application-controller (the “brain” that syncs your apps).repoServer:Configuration for the component that handles Git cloning and manifest generation.configs:Where you define things likecm(ConfigMaps) for custom styles orparamsfor system-wide behavior.
How to Use the File
Once you’ve identified a setting you want to change (for example, enabling the ingress), you don’t need to keep the entire 2,000-line file. It is best practice to create a “thin” values file:
- Create a new custom file called e.g.
my-values.yaml. - Add only the specific keys you want to override:
server:
  service:
    type: LoadBalancer
- Apply it during your installation or upgrade:
helm upgrade --install argocd argo/argo-cd -n argocd -f my-values.yaml
Accessing the UI
Just like the manifest installation, you’ll need to retrieve the autogenerated password:
kubectl -n argocd get secret argocd-initial-admin-secret -o jsonpath="{.data.password}" | base64 -d; echo
Then, port-forward to access the dashboard:
kubectl port-forward service/argocd-server -n argocd 8080:443
Default username is admin.
⚠️ NOTE
For production environment use Ingress with custom domain for ArgoCD UI Dashboard.
For more information, see Ingress Configuration.
How to Upgrade
One of the biggest advantages of using Helm is the ease of upgrading to newer versions of Argo CD:
helm repo update
helm upgrade argocd argo/argo-cd --namespace argocd
Note: Since we are using a Kind cluster with multiple nodes, Argo CD will treat all those nodes as part of the “in-cluster” destination (https://kubernetes.default.svc), allowing to deploy applications to any of those worker nodes easily.
Provision ArgoCD UI Dasboard with Ingress
⚠️ IMPORTANT
Please be aware that for demo purposes and simplicity we are using Nginx Ingress Controller that was archived and deprecated by Kubernetes Community.For production use-cases consider using other Ingress Controllers or Gateway API.
If you already have a cluster running, you will need to recreate it. We must add extraPortMappings to pass traffic from your real machine into the Docker container running the control plane, and label it as ingress-ready.
Save this file as kind-ingress-config.yaml:
kind: Cluster
apiVersion: kind.x-k8s.io/v1alpha4
nodes:
  - role: control-plane
    kubeadmConfigPatches:
      - |
        kind: InitConfiguration
        nodeRegistration:
          kubeletExtraArgs:
            node-labels: "ingress-ready=true"
    extraPortMappings:
      - containerPort: 80
        hostPort: 80
        protocol: TCP
      - containerPort: 443
        hostPort: 443
        protocol: TCP
  # Adding worker nodes
  - role: worker
  - role: worker
  - role: worker
Spin up the cluster using this config:
kind create cluster --name argo-project --config kind-ingress-config.yaml
If you need to delete cluster:
kind delete cluster --name argo-project
Deploy the NGINX Ingress Controller
The standard NGINX Ingress manifest needs slight tweaks to run properly inside Kind (such as utilizing the host ports we just mapped and scheduling onto our labeled control-plane node).
The Kubernetes team maintains a dedicated manifest specifically for Kind. Run this command to deploy it:
kubectl apply -f https://raw.githubusercontent.com/kubernetes/ingress-nginx/main/deploy/static/provider/kind/deploy.yaml
⚠️ IMPORTANT
The latest nginx ingress controller kind manifest no longer enforces thenodeSelectorforingress-ready=true, so it is required explicitly patch Nginx Ingress deployment. However, old releases has that support as in here.Without that, the pod lands on a worker node which has no host port mappings, so port 80 never gets traffic
Patch the deployment to make Ingress controller pods run on the control-plane node:
kubectl patch deployment ingress-nginx-controller -n ingress-nginx --type=json \
  -p='[{"op":"add","path":"/spec/template/spec/nodeSelector","value":{"ingress-ready":"true"}}]'
Wait until ready:
kubectl wait --namespace ingress-nginx \
  --for=condition=ready pod \
  --selector=app.kubernetes.io/component=controller \
  --timeout=90s
You should see output similar to this:
pod/ingress-nginx-controller-56dc4b4c6-wmlm6 condition met
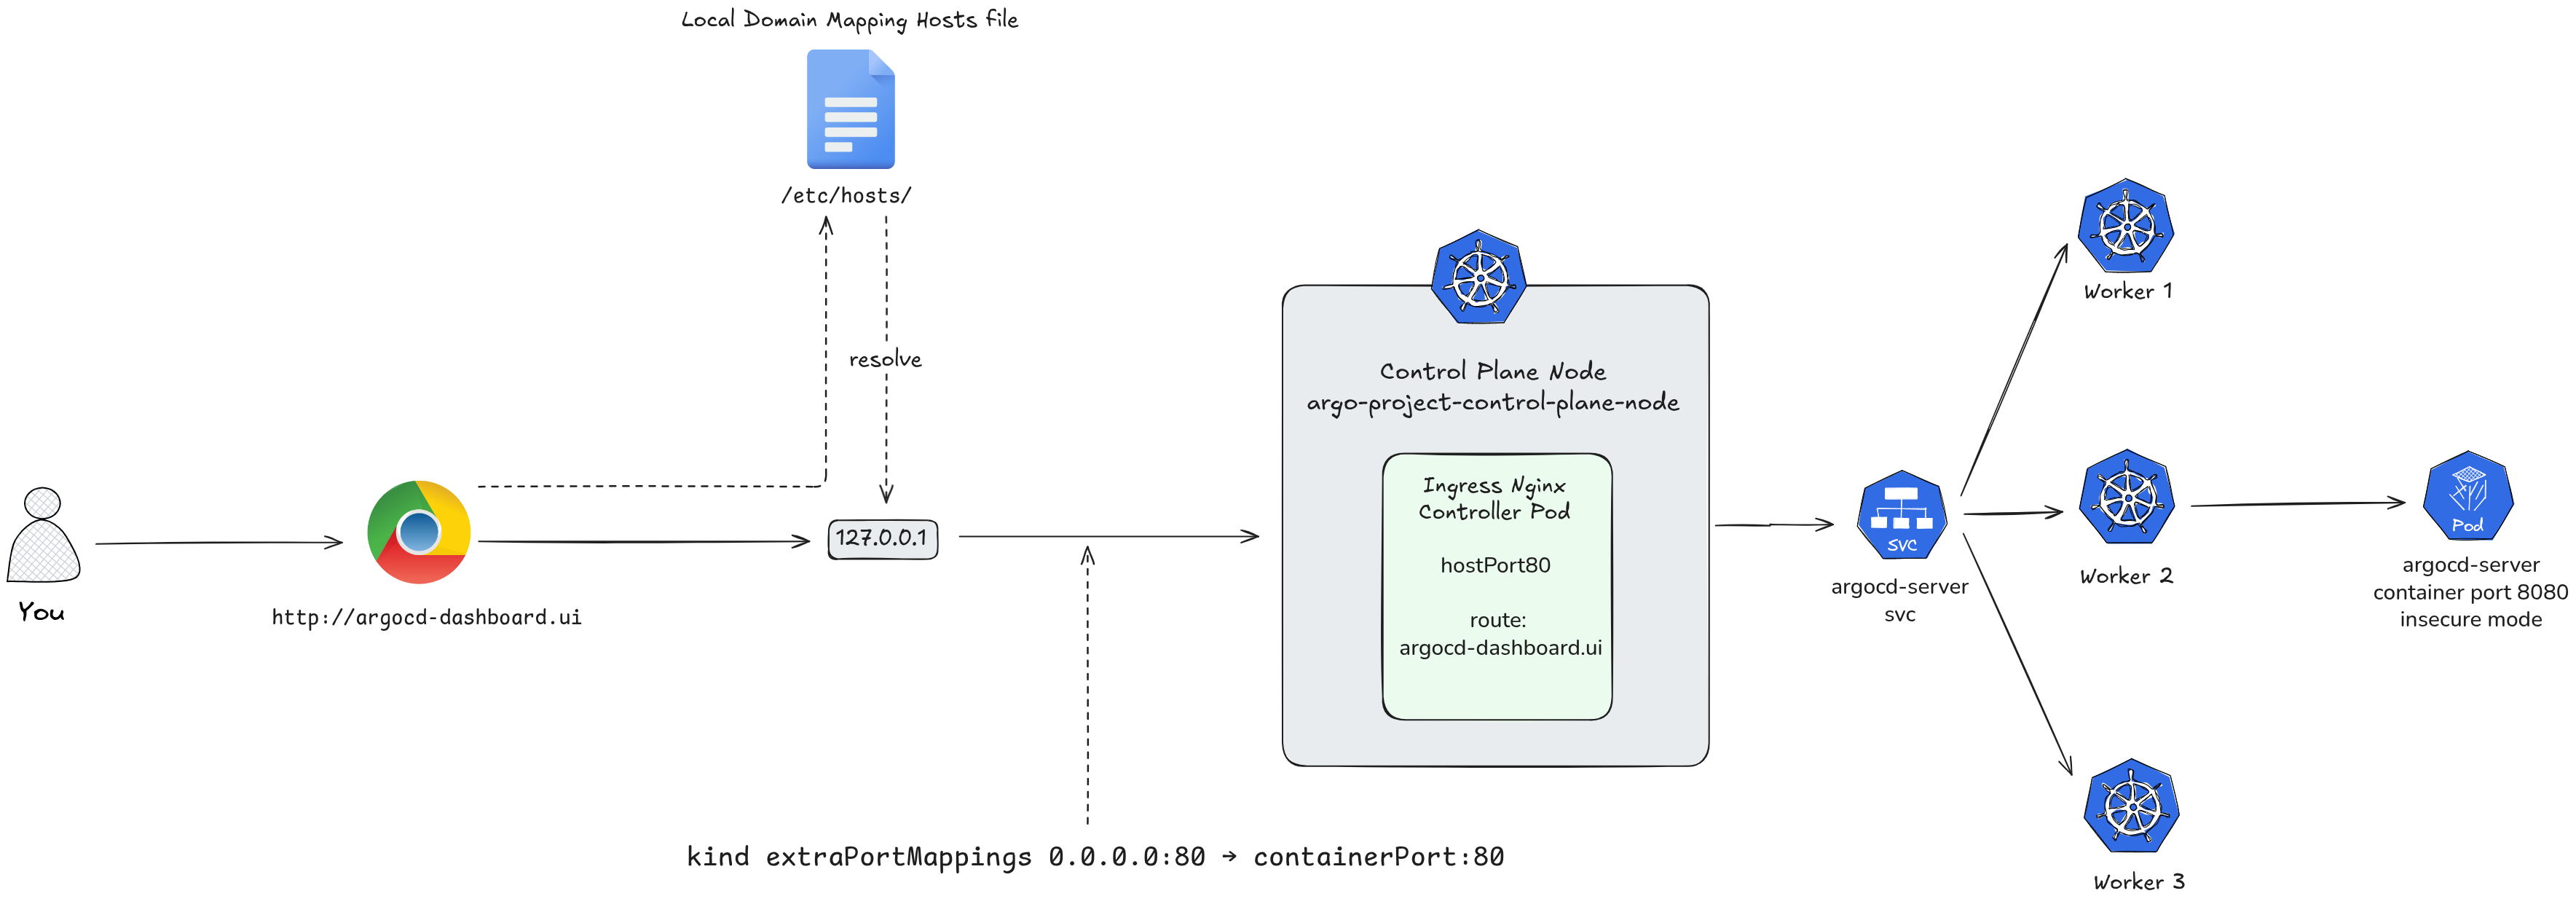
Testing With Local Domain
For local testing, you don’t need to buy a real domain name or modify your DNS records on the internet. Instead, you can use a local hosts file override.
This method tells your operating system that a specific domain name lives at 127.0.0.1 (localhost) instead of looking it up on the internet.
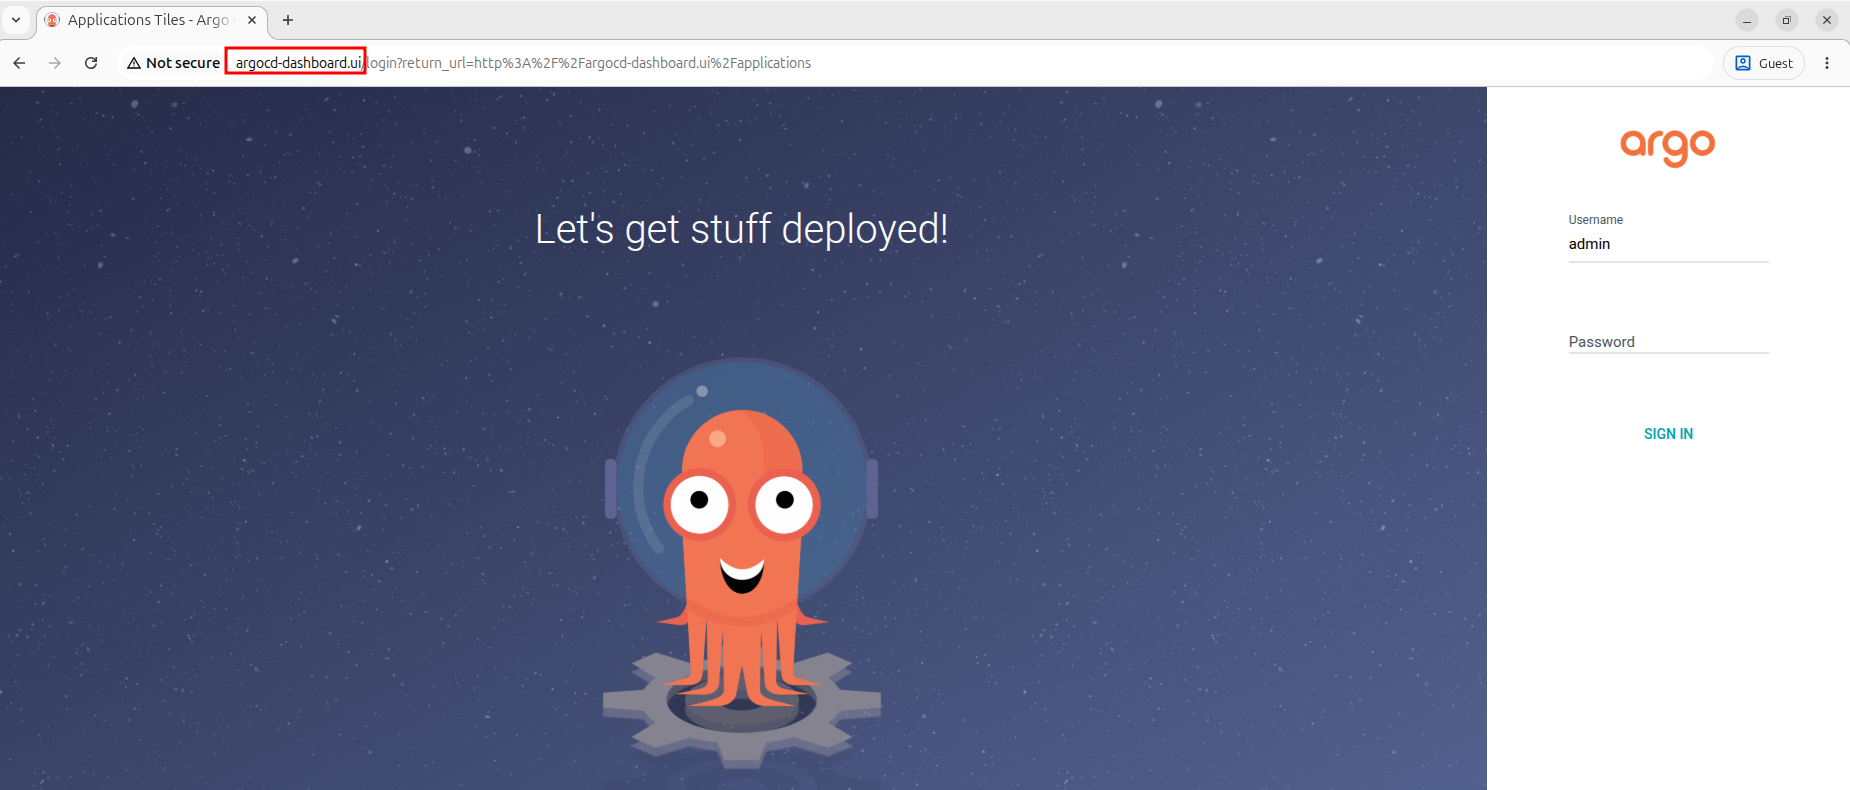
- Pick a fake domain name for testing, such as
argocd-dashboard.uiormy-app.test. - Open your machine’s hosts file:
- Linux / macOS:
sudo vim /etc/hosts
- Add the following line at the bottom of the file:
127.0.0.1 argocd-dashboard.ui
- Save and close the file.
Now, you can update your Argo CD Ingress resource to use argocd-dashboard.ui as the host. When you type http://argocd-dashboard.ui into your browser, your computer will route the traffic straight into your Kind cluster.
How to Update your Ingress with the Test Domain
To apply this to your Argo CD Helm deployment, update your argocd-ingress-values.yaml file with your chosen testing domain:
global:
  domain: argocd-dashboard.ui

configs:
  params:
    server.insecure: true

server:
  ingress:
    enabled: true
    ingressClassName: nginx
    hostname: argocd-dashboard.ui
    annotations:
      nginx.ingress.kubernetes.io/force-ssl-redirect: "false"
global.domain— sets argocd.localhost as the base domain used by the chartconfigs.params.server.insecure: true— runs ArgoCD server in HTTP mode, letting the ingress handle SSL terminationserver.ingress.enabled: true— creates the Ingress resourceserver.ingress.ingressClassName: nginx— targets the nginx ingress controller (standard for kind)server.ingress.hostname: argocd.localhost— the hostname to access the UI
the annotation disables forced SSL redirect since we’re running insecure locally
Then upgrade the chart:
helm install argocd argo/argo-cd -n argocd -f argocd-ingress-values.yaml
Once applied, you can open your browser and navigate directly to your test domain http://argocd-dashboard.ui to access the Argo CD dashboard.
The whole flow of your traffic looks like this now: